
Yes, you can absolutely replace your lawn with gravel for a beautiful, low-maintenance yard. This is a fantastic way to embrace drought tolerant landscaping and create a sustainable outdoor space.
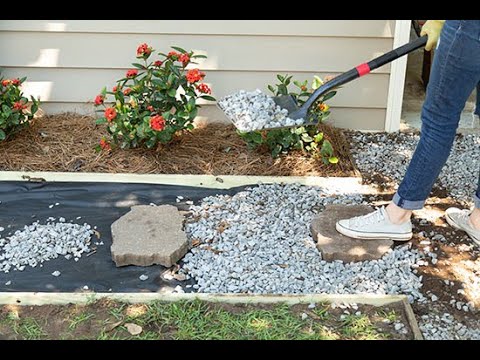
Image Source: i.ytimg.com
Why Swap Your Lawn for Gravel?
Are you tired of endless mowing, watering, and fertilizing? Do you dream of a yard that looks great without demanding all your free time? Replacing your lawn with gravel might be the perfect solution. This type of gravel landscaping offers a host of benefits, transforming your outdoor space into a beautiful, functional, and incredibly easy-to-manage environment. It’s a key component of xeriscaping with gravel, which focuses on water conservation and minimal upkeep.
Benefits of Gravel Landscaping
- Reduced Water Needs: Gravel doesn’t need watering like grass, making it ideal for dry climates and water-conscious homeowners. This is a cornerstone of drought tolerant landscaping.
- Minimal Maintenance: Say goodbye to mowing, edging, and fertilizing. Gravel areas require very little attention.
- Cost-Effective: While the initial installation has costs, the long-term savings on water, fertilizer, and lawn care equipment can be substantial.
- Durability: Gravel is resistant to pests, diseases, and heavy foot traffic.
- Aesthetic Appeal: Gravel comes in various colors, sizes, and textures, offering immense design flexibility for your gravel yard ideas.
- Permeability: When installed correctly, gravel allows water to seep into the ground, reducing runoff and replenishing groundwater. This creates permeable surfaces.
- Weed Suppression: With proper preparation, gravel can significantly reduce weed growth.
- An Alternative to Artificial Turf: For those seeking a natural look without the high maintenance of a traditional lawn or the environmental concerns of some artificial turf products, gravel is a smart choice.
Getting Started: Planning Your Gravel Landscape
Before you start hauling bags of gravel, careful planning is essential. Think about how you use your yard, the overall look you want to achieve, and the practicalities of the installation.
Step 1: Design and Layout
What do you envision for your new gravel space?
Sketching Your Vision
- Map your yard: Draw a rough outline of the area you plan to convert.
- Identify key features: Mark existing trees, shrubs, patios, walkways, and structures.
- Determine pathways: How will people move through your yard? Will you have main paths or just scattered areas?
- Consider seating or gathering areas: Where will you place furniture or enjoy your outdoor space?
- Incorporate planting: Gravel doesn’t mean no plants! Consider drought-tolerant plants, ornamental grasses, and sturdy shrubs that thrive in rocky environments. This can add color and texture to your rock garden design.
Incorporating Plants and Features
- Planting pockets: Create designated areas within the gravel for plants.
- Edging: Use materials like metal, stone, wood, or composite edging to contain the gravel and create clean lines. This is crucial for a tidy low-maintenance yard.
- Decorative elements: Think about adding boulders, sculptures, or water features.
Step 2: Choosing Your Gravel
The type of gravel you choose will significantly impact the look, feel, and functionality of your landscape.
Types of Gravel
| Gravel Type | Description | Best Uses |
|---|---|---|
| Pea Gravel | Small, rounded stones, typically 3/8 to 1/2 inch in diameter. | Pathways, decorative ground cover, drainage. Can shift easily. |
| Crushed Stone | Angular, sharp-edged stones. Common sizes include #57, #3, and screenings. | Driveways, pathways, base layers. Angular shape helps it lock together. |
| Decomposed Granite | Finely crushed granite that compacts well, creating a firm surface. | Patios, pathways, play areas. Can become dusty when dry. |
| River Rock | Smooth, rounded stones of various sizes, often in natural colors. | Decorative accents, dry creek beds, around plants. Can be expensive. |
| Gravel Blends | Mixes of different sizes and colors for a unique look. | General landscaping, visual appeal. |
Gravel Considerations
- Color: Gravel comes in a wide spectrum, from earthy browns and tans to grays, whites, and even reds. Choose a color that complements your home and existing landscape.
- Size and Shape: Rounded stones are comfortable underfoot but can spread. Angular crushed stone locks together better for stable surfaces.
- Cost: Prices vary based on type, quality, and quantity. Bulk delivery is often more economical than bagged gravel.
- Quantity: Calculate the square footage of your area and the desired depth of gravel (typically 2-4 inches for pathways and patios).
The Installation Process: Step-by-Step
A successful gravel landscape relies on proper preparation to prevent weeds and ensure stability.
Step 1: Lawn Removal
This is a critical step for a truly low-maintenance yard. You don’t want grass roots trying to push through your new gravel surface.
Methods for Lawn Removal
- Sod Cutter: Renting a sod cutter is the fastest way to remove an existing lawn. It slices under the grass and roots, allowing you to roll up the sod.
- Sheet Mulching (Lasagna Gardening): This is a no-dig, eco-friendly method. Layer cardboard, compost, and other organic materials over the grass. It smothers the grass and decomposes over time, enriching the soil. This method takes longer but is excellent for soil health.
- Tilling: While tilling breaks up the sod, it can also chop up weed roots and grass rhizomes, potentially leading to more weeds later. If you till, be prepared for diligent weed management.
- Solarization: Covering the area with clear plastic during hot, sunny months can bake and kill the grass and weed seeds. This is best done in summer.
Step 2: Preparing the Base
A well-prepared base is crucial for a stable and long-lasting gravel installation.
Excavation
- Depth: You’ll typically need to excavate 4-6 inches to accommodate the gravel and a base layer. The depth depends on the type of gravel and the intended use (e.g., a driveway needs a deeper base than a decorative area).
- Edging: Install your chosen edging material around the perimeter of the excavated area.
Adding a Base Layer (Optional but Recommended)
- Gravel or Crushed Stone: For areas that will see a lot of foot traffic or vehicle use, adding a layer of crushed stone (like #57 or #3 stone) as a base provides excellent stability and drainage.
- Compaction: Compact the base layer thoroughly using a plate compactor or hand tamper.
Step 3: Installing Landscape Fabric for Gravel
This is arguably the most important step in preventing weeds and maintaining your low-maintenance yard.
What is Landscape Fabric for Gravel?
Landscape fabric, often called geotextile fabric or weed barrier fabric, is a permeable material that suppresses weed growth while allowing water and air to pass through. Using the right landscape fabric for gravel will save you countless hours of weeding later.
Installation of Landscape Fabric
- Lay the Fabric: Unroll the fabric over the prepared base layer. Overlap seams by at least 6-8 inches to prevent weeds from growing through the gaps.
- Secure the Fabric: Use landscape staples or rocks to hold the fabric in place. You can also tuck the edges under the edging material.
- Cut Openings: If you’re planting trees or shrubs, cut an “X” in the fabric and fold the flaps back, then plant as usual.
Step 4: Adding and Spreading the Gravel
Now for the visually satisfying part!
Calculating Gravel Needs
- Volume: Area (sq ft) x Depth (ft) = Volume (cubic ft). Divide by 27 to get cubic yards.
- Coverage: Check the gravel supplier’s recommendations for coverage per cubic yard or ton. A common rule of thumb is one ton of gravel covers about 100 square feet at a 2-inch depth.
Spreading the Gravel
- Delivery: Have gravel delivered in bulk to your driveway or a convenient spot.
- Distribution: Use a shovel and wheelbarrow to spread the gravel evenly over the landscape fabric.
- Leveling: Use a rake to distribute the gravel and create a smooth, level surface.
- Compaction (Optional): For a more compacted surface, you can use a plate compactor. This is especially useful for pathways and patios.
Maintaining Your Gravel Landscape
The beauty of this type of landscaping is its inherent low-maintenance yard nature. However, a little attention here and there will keep it looking its best.
Seasonal Tasks
- Raking: Periodically rake the gravel to redistribute it and smooth out any areas that may have settled or become uneven.
- Weeding: While the fabric significantly reduces weeds, a few might still sprout from seeds blown onto the surface. Pull them by hand as soon as you see them. It’s much easier than pulling them from soil.
- Debris Removal: Clear away fallen leaves, branches, and other organic debris. These can decompose and create a planting medium for weeds.
- Replenishment: Over time, gravel can settle or get displaced. You might need to add a thin layer every few years to maintain the desired depth.
Addressing Potential Issues
- Weeds: If weeds become persistent, consider spraying them with a horticultural vinegar solution or a targeted weed killer. Ensure the product is safe for use around your plants and permeable surfaces.
- Gravel Displacement: Ruts can form in areas with heavy foot traffic. Rake and replenish these areas as needed.
- Silt Buildup: Over many years, fine particles can accumulate on the gravel surface, potentially hindering drainage. Periodically power washing or a good rake can help.
Creating a Stunning Gravel Yard: Design Ideas
Gravel yard ideas are as varied as your imagination! Here are some ways to make your gravel landscape truly shine.
Complementing Plants
- Drought-Tolerant Shrubs and Perennials: Agave, Yucca, Lavender, Sedum, Coneflower, and Ornamental Grasses thrive in gravelly, well-drained conditions.
- Cacti and Succulents: These are natural fits for xeriscaping with gravel.
- Groundcovers: Low-growing, creeping plants can add texture and color between larger gravel areas or as accents.
- Container Plants: Use pots and planters to add pops of color and seasonal interest.
Integrating Features
- Dry Creek Beds: Use smooth river rocks or decorative gravel to mimic a natural dry creek bed, adding visual interest and helping with drainage.
- Fire Pits and Seating Areas: Gravel provides a stable and fire-safe base for outdoor seating and fire features.
- Sculptures and Boulders: Large rocks or art pieces can create focal points in your gravel garden.
- Pathways: Use different colored or textured gravel for pathways that wind through your landscape.
- Decorative Edging: Metal, stone, or brick edging can define beds and prevent gravel from migrating.
Gravel Yard Ideas for Different Zones
- Front Yard: A clean, welcoming gravel pathway leading to the entrance, perhaps with a few strategically placed drought-tolerant plants or a decorative boulder.
- Backyard Patio: Decomposed granite or a finer crushed stone creates a firm surface for outdoor dining and lounging. Accent with larger river rocks or planters.
- Side Yards: Convert narrow or often-unused side yards into functional, attractive spaces with gravel and a few hardy plants.
- Children’s Play Areas: While some play equipment might be better on soft surfaces, a designated gravel area can be a good choice for certain play structures.
Frequently Asked Questions (FAQ)
Will gravel get hot in the sun?
Yes, like any hard surface, gravel can absorb and radiate heat. The temperature will depend on the color and type of gravel. Lighter-colored gravel tends to absorb less heat than darker varieties. Planting trees or shrubs to cast shade over seating areas can also help mitigate the heat.
Can I put gravel over an existing lawn without removing it?
While it might seem like a shortcut, it’s not recommended. Grass and weeds will eventually grow through the gravel if the lawn isn’t properly removed and a barrier like landscape fabric isn’t installed. This will undermine the low-maintenance aspect you’re aiming for.
How much gravel do I need?
To calculate, measure the length and width of your area in feet to get square footage. Then decide on the depth you want (2-4 inches is common for landscaping). Convert inches to feet (e.g., 3 inches = 0.25 feet). Multiply square footage by depth in feet to get cubic feet. Divide cubic feet by 27 to get cubic yards. Always round up to ensure you have enough.
What is the best type of gravel for a pathway?
For pathways, a crushed stone like #57 or decomposed granite is often preferred. These materials compact well, creating a firm and stable surface that’s less likely to shift underfoot. Pea gravel is also popular for its smooth texture but can be prone to scattering.
How do I prevent weeds in my gravel yard?
The most effective method is to install a high-quality landscape fabric for gravel before laying the gravel. This acts as a physical barrier. Ensure seams are overlapped and the fabric is properly secured. Promptly remove any weeds that do sprout.
Is gravel a good choice for xeriscaping with gravel?
Absolutely. Gravel is an excellent material for xeriscaping with gravel as it requires no watering, suppresses weeds, and allows water to penetrate the soil. It’s a cornerstone of drought tolerant landscaping.
Can I use gravel as an artificial turf alternative?
Yes, gravel can serve as a visually appealing and highly practical artificial turf alternative. It offers a natural look, is permeable, and requires significantly less maintenance than a lawn or artificial turf.
How do I deal with drainage in a gravel yard?
Proper installation is key. Excavating a sufficient depth and using permeable landscape fabric ensures water can drain through. If you have areas prone to standing water, consider incorporating a dry creek bed made of gravel or installing French drains beneath the gravel layer. Permeable surfaces are a major advantage of gravel landscapes.
Can I mix different types of gravel for a rock garden design?
Yes, mixing gravel types can add texture and visual interest to your rock garden design. Consider using a base of crushed stone for stability and then topping it with decorative pea gravel or river rocks for aesthetic appeal. Just ensure they are compatible in terms of drainage and stability.
Conclusion
Transforming your lawn into a gravel landscape is a journey toward a more sustainable, beautiful, and remarkably low-maintenance outdoor living space. From the initial planning and material selection to the final installation, each step contributes to a yard that offers visual appeal and practical benefits for years to come. Embrace the simplicity and elegance of gravel landscaping, and enjoy the freedom of a low-maintenance yard that truly shines.