
Can you fill in low spots in your lawn? Yes, you absolutely can! Filling in low spots in your lawn is a common lawn care task that improves its appearance, promotes healthier grass growth, and prevents pooling water. This guide will walk you through the process, from identifying the problem to achieving a smooth, even lawn.
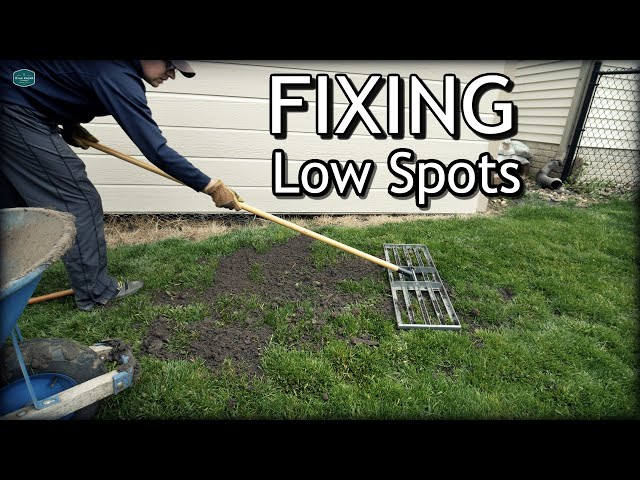
Image Source: i.ytimg.com
Why Low Spots Happen
Low spots in your lawn, also known as depressions or sunken areas, can form for several reasons. Often, they are simply the result of natural settling over time. However, other factors can contribute significantly. Soil compaction is a major culprit. When soil is repeatedly walked on or driven over, it gets squeezed, pushing air out and making the ground sink. Poor soil drainage can also lead to low spots. If water doesn’t drain away effectively, it can saturate the soil, causing it to settle and become compacted.
Another common cause is the decomposition of organic matter. If you’ve ever buried branches or other yard waste, these materials will break down over time, leaving a void that the soil above collapses into. Old tree stumps or animal burrows can also create these sunken areas. Sometimes, even improper grading during initial landscaping can lead to persistent low spots where water naturally collects. Addressing these issues is a crucial part of lawn renovation and maintaining a healthy, attractive yard.
Assessing Your Low Spots
Before you grab any tools, it’s essential to figure out how bad your low spots are. A quick visual inspection is the first step. Are they shallow dips or deep holes? Do they hold water after it rains? This will help you decide on the best method for lawn leveling.
Types of Low Spots and Their Solutions
| Low Spot Depth | Primary Cause | Recommended Filling Material |
|---|---|---|
| Shallow (under 1 inch) | Minor settling, light compaction | Topsoil, compost, or a soil amendment mixture |
| Moderate (1-3 inches) | Moderate settling, soil compaction, organic decomposition | Topsoil, sand, compost, or a balanced soil amendment |
| Deep (over 3 inches) | Significant settling, old debris, animal burrows | Topsoil mixed with compost or other organic matter |
If your low spots have poor soil drainage, you might need to think about improving the soil structure itself as part of the filling process. This could involve adding materials that help water move through the soil more easily.
Gathering Your Supplies
For most lawn leveling projects, you’ll need a few key items:
- Topsoil: This is the foundation of your repair. Good quality topsoil is essential for encouraging grass to grow.
- Compost or Soil Amendment: Adding compost or a good soil amendment enriches the topsoil with nutrients and improves its texture, aeration, and drainage.
- Shovel or Spade: For moving the soil and breaking up any compacted areas.
- Rake: A garden rake is perfect for spreading and smoothing the soil.
- Wheelbarrow: Makes transporting materials much easier.
- Garden Hose or Watering Can: To water the newly filled areas.
- Grass Seed or Sod: To re-establish grass in the filled spots.
- Optional: Aerator: If your lawn has significant soil compaction, aerating before filling can help.
Step-by-Step Guide to Filling Low Spots
Filling low spots is a straightforward process. Let’s break it down into simple steps.
Step 1: Prepare the Area
Start by clearing the low spot of any debris like leaves, twigs, or rocks. If the grass in the area is very thin or patchy, you might consider giving it a light raking to loosen the surface. For deeper spots, or areas with significant soil compaction, gently loosen the soil at the bottom of the depression with a shovel or garden fork. This helps the new soil mix better with the existing soil and promotes better root growth.
Tip: If you’re dealing with a large or particularly stubborn low spot, consider aeration before you begin filling. This process creates small holes in the soil, reducing compaction and allowing the new topsoil and amendments to penetrate more effectively.
Step 2: Choose Your Filling Material
The best material depends on the depth of the low spot and your soil type.
Topsoil as Your Base
High-quality topsoil is your go-to for filling most depressions. Look for topsoil that is free of weeds and large rocks. It should be loamy, meaning it has a good balance of sand, silt, and clay, which is ideal for most lawns.
Enhancing with Compost or Soil Amendments
Mixing in compost or a suitable soil amendment with your topsoil is highly recommended. Compost adds vital organic matter, which improves soil structure, fertility, and water retention. Other soil amendments can help with specific issues, like improving drainage or adjusting soil pH.
- Compost: Excellent for general soil improvement.
- Peat Moss: Helps retain moisture, good for sandy soils.
- Sand: Improves drainage in clay soils, but use sparingly to avoid creating concrete-like conditions.
- Commercially Blended Topsoil Mixes: Often contain a good balance of topsoil, compost, and other amendments.
For shallow dips (less than an inch), a good quality topsoil or a mix of topsoil and compost is usually sufficient. For moderate dips (1-3 inches), a blend of topsoil and compost, or a more robust soil amendment that addresses drainage or structure, might be better. For deep holes, you’ll need more substantial amounts of topsoil, potentially mixed with compost.
Step 3: Add the Filling Material
Begin adding your chosen topsoil and amendment mixture to the low spot. Don’t just dump it all in at once. Add it in layers, about 2-3 inches at a time. Gently tamp down each layer with your feet or the back of a rake. This helps to settle the soil and prevent it from sinking further later on.
Important: Avoid filling the low spot completely level with the surrounding lawn in one go, especially for deeper depressions. The soil will settle over time. Aim to fill it slightly higher than the surrounding grade.
Step 4: Level and Smooth
Once you’ve added the final layer of soil, use your rake to level the area. Spread the soil evenly, ensuring it’s slightly mounded to account for future settling. The goal is a smooth transition from the surrounding lawn to the filled area. Gently rake back and forth, pulling soil from higher areas to fill any remaining dips, until the surface is uniform.
Step 5: Re-establish Grass
Now that your low spot is filled and leveled, it’s time to get grass growing again. You have two main options: overseeding or sodding.
Overseeding
This is often the most cost-effective method for smaller areas.
- Prepare the Surface: Lightly roughen the surface of the newly filled soil with your rake. This creates a better seedbed for the grass seeds to germinate.
- Spread Seed: Sprinkle your chosen grass seed evenly over the prepared area. Follow the recommendations on the seed packaging for the correct seeding rate.
- Lightly Rake and Cover: Gently rake the seeds into the top layer of soil. You can also lightly cover them with a thin layer of straw or a specialized seed-starting mulch to help retain moisture and protect the seeds from birds.
- Water Gently: Water the area lightly but frequently. The soil should be kept consistently moist, but not waterlogged, until the grass is well-established.
Sodding
For a quicker, more immediate result, especially for larger areas or if you want a mature look right away, sodding is a great option.
- Prepare the Surface: Similar to overseeding, prepare the filled area by lightly raking the surface.
- Lay Sod: Place strips of sod over the filled area, fitting them together snugly like puzzle pieces. Make sure the bottom of the sod makes good contact with the topsoil you’ve added.
- Tamp Down: Gently tamp the sod down with your feet or a roller to ensure good soil-to-sod contact.
- Water Thoroughly: Water the new sod deeply and immediately after installation. Continue to water regularly to keep the sod moist until the roots have established into the new soil.
Step 6: Ongoing Care
After filling the low spots and establishing new grass, consistent care is key.
- Watering: Water the repaired areas as needed, especially during dry periods.
- Mowing: Once the new grass has grown to about 3-4 inches, you can mow it. For overseeded areas, wait until the grass is at least 3 inches tall before the first mowing. If you used sodding, you can usually mow it once it has rooted, typically after a week or two.
- Fertilizing: Apply a starter fertilizer a few weeks after seeding or sodding to encourage healthy growth.
Dealing with Persistent or Large Low Spots
If you have extensive or very deep low spots, you might be looking at a more involved lawn renovation.
Addressing Soil Drainage Issues
If your low spots are consistently waterlogged, the problem might be poor soil drainage. Simply filling them with topsoil might not be enough if the water has nowhere to go.
- Aeration: As mentioned, regular aeration can help improve drainage in compacted soils.
- Amendments: Incorporating soil amendment materials like coarse sand or organic matter can improve drainage in heavy clay soils.
- French Drains: For severe drainage problems, you might consider installing a French drain system to redirect excess water away from the area. This is a more advanced project.
The Layering Method for Deeper Depressions
For very deep low spots (more than 4-6 inches), filling with a single type of topsoil might lead to significant settling. A layering approach can be more effective:
- Fill with Bulking Material: Start by filling the deepest part of the hole with coarser material like small gravel or even small rocks. This provides drainage and reduces the amount of expensive topsoil needed. Ensure these materials are clean and free of sharp edges that could damage mower blades.
- Add Soil Mixture: Layer topsoil mixed with compost or a suitable soil amendment on top of the bulking material. Add this in 4-6 inch increments, watering and lightly compacting each layer.
- Top Layer: Finish with a good layer of high-quality topsoil and compost, mounded slightly higher than the surrounding lawn to account for settling.
- Seed or Sod: Once leveled, proceed with overseeding or sodding.
When to Consider Professional Help
If you have widespread or very deep low spots, or if you suspect underlying drainage issues, it might be worth consulting a professional lawn care service. They can assess the situation and recommend the best course of action, which could include more extensive lawn renovation techniques.
Preventing Future Low Spots
Prevention is always easier than repair. Here are some tips to keep your lawn level and healthy:
- Regular Aeration: Combat soil compaction by aerating your lawn annually or bi-annually.
- Avoid Over-watering: Water deeply but less frequently to encourage strong root growth and prevent surface soil saturation.
- Proper Grading: Ensure your lawn has a slight slope away from your house and other structures to promote good soil drainage.
- Limit Foot Traffic: Discourage excessive foot traffic on the same paths, which can lead to compaction.
- Top Dressing: Regularly adding a thin layer of compost or topsoil (top dressing) can help maintain a smooth surface and enrich the soil over time. This is a great way to gradually fill very minor depressions.
Frequently Asked Questions
Q1: How deep can I fill a low spot in my lawn?
A1: You can fill low spots up to about 4-6 inches deep with a good topsoil and compost mixture. For deeper depressions, consider using a layering method with bulking material at the bottom or consult a professional for lawn renovation. Filling too deeply with organic matter alone can sometimes create anaerobic conditions that are bad for grass roots.
Q2: Can I just fill low spots with sand?
A2: While sand can be used as a soil amendment to improve drainage in clay soils, filling low spots solely with sand is generally not recommended. Sand alone doesn’t contain many nutrients and can sometimes create a hardpan layer if mixed incorrectly with existing soil. A blend of topsoil, compost, and perhaps some sand for drainage is usually a better choice.
Q3: How long does it take for grass to grow in a filled low spot?
A3: If you overseed, you should see germination within 7-14 days, and the grass should be established enough for mowing within 3-4 weeks. If you use sodding, you’ll have an instant result, but it will take about 2-4 weeks for the sod to fully root into the new topsoil.
Q4: What if the low spot keeps coming back?
A4: If a low spot repeatedly appears in the same place, it might indicate an underlying issue such as significant soil compaction, poor soil drainage, or the decomposition of buried organic matter. You may need to investigate further, possibly by excavating the area, removing the source of the problem (like buried wood), and then refilling with a good topsoil and amendment mix. Persistent water pooling might require a more complex drainage solution.
Q5: Can I fill low spots in the fall?
A5: Yes, fall is actually an excellent time to fill low spots, especially if you plan to overseed. The cooler temperatures and increased moisture in the fall provide ideal conditions for grass seed germination and establishment. Just ensure the ground isn’t frozen when you apply the topsoil and seed.
By following these steps, you can effectively tackle those annoying low spots and enjoy a smoother, healthier, and more attractive lawn. Remember that good soil amendment and proper techniques are key to long-term success.