
Yes, you can achieve those beautiful, eye-catching stripes in your lawn. Getting lawn stripes is a popular way to enhance the visual appeal of your yard, making it look manicured and professional. This guide will walk you through the best tips and tricks for achieving those perfect lawn stripes.
Image Source: greenpal-production.s3.amazonaws.com
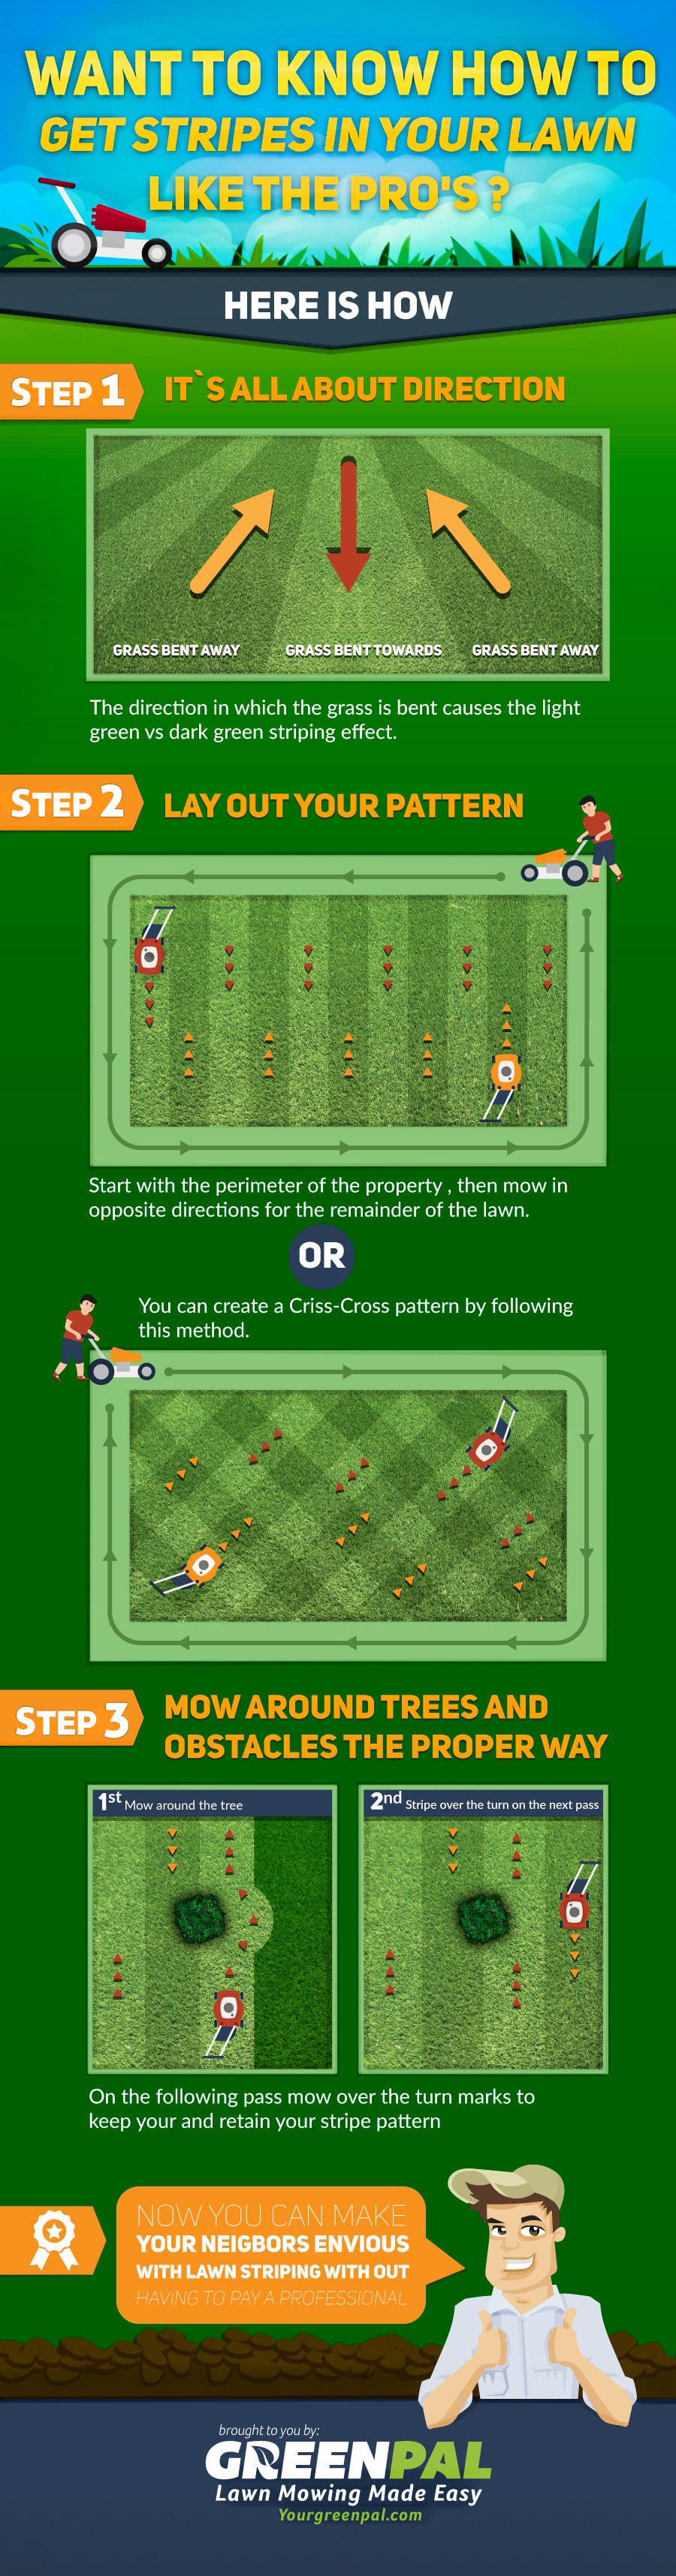
The Magic of Lawn Stripes
What makes those crisp lines appear on a well-kept lawn? It’s not magic; it’s science and a bit of simple technique. Lawn stripes are created by bending the grass blades in opposite directions. When you look at the grass, the blades bent away from you reflect more light, appearing lighter. The blades bent towards you absorb more light, appearing darker. This contrast is what creates the striped effect.
Essential Tools for Striping Your Lawn
To get those lawn care stripes looking their best, you’ll need a few key tools. While some mowers can create subtle stripes, a dedicated tool will significantly improve your results.
The Mighty Lawn Roller
One of the most effective tools for how to stripe a lawn is a lawn roller. A lawn roller is a heavy cylinder, usually filled with water or sand, that is pulled behind a mower or by hand. Rolling the grass gently presses down the blades, helping to set the direction of the bend and enhance the contrast between the stripes.
Types of Lawn Rollers:
- Pull-Behind Rollers: These attach to your lawn tractor or riding mower. They are ideal for larger lawns and provide consistent pressure.
- Push Rollers: These are smaller and are pushed by hand. They are suitable for smaller lawns or for touching up areas that a pull-behind roller might miss.
- Spike Aerator Rollers: Some rollers have spikes that also aerate the soil while rolling. This is a great dual-action tool for lawn health and striping.
The Mower’s Role
Your mower plays a crucial part in achieving lawn stripes.
- Reel Mowers: These mowers cut grass with a rotating cylinder of blades. Reel mower stripes are often the most pronounced and cleanest because the blades are precisely cut and the roller on the front of most reel mowers helps bend the grass. If you’re serious about professional lawn stripes, a reel mower is a top contender.
- Rotary Mowers: Most homeowners use rotary mowers. While they can create stripes, you often need to add a striping kit.
Lawn Mower Striping Kits
A striping kit typically attaches to the back of your rotary mower. It features a roller that bends the grass blades as you pass over them. These kits are relatively inexpensive and a fantastic addition for anyone looking to master DIY lawn stripes. They work by creating a greater angle of bend in the grass, thus enhancing the light reflection and shadow contrast.
The Art of Creating Lawn Stripes: Step-by-Step
Now, let’s get down to the nitty-gritty of how to stripe a lawn. Following these steps will help you achieve the best way to get lawn stripes.
Step 1: Prepare Your Lawn
Before you start striping, ensure your lawn is in good condition.
- Mow Regularly: Healthy, consistently mowed grass is easier to stripe.
- Water Appropriately: Avoid watering right before striping, as wet grass can clump and create uneven stripes.
- Fertilize: A well-fed lawn has denser, more upright grass, which takes a bend better.
- Aeration (Optional but Recommended): If your soil is compacted, consider aerating your lawn a few weeks before you plan to stripe. This improves air and water circulation, leading to healthier grass that stripes better.
Step 2: Choose Your Mower and Attachments
Ensure your mower is in good working order. If you have a rotary mower, attach your striping kit. Make sure it’s securely fastened and aligned correctly.
Step 3: Plan Your Striping Pattern
Lawn striping patterns can be simple straight lines or more complex designs. For beginners, straight parallel lines are the easiest and most effective.
- Starting Point: Begin with a straight line along the edge of your lawn, perhaps along a sidewalk or driveway. This provides a clear boundary to follow.
- Direction: Decide which direction you want your stripes to run. Consider the overall look you want for your yard and how the light hits it at different times of the day.
Step 4: The Mowing Technique for Stripes
This is where the action happens!
- First Pass: Mow in a straight line, following your chosen edge.
- Second Pass: Turn your mower around at the end of the line. For the second stripe, you will mow in the opposite direction, right next to the first stripe. Crucially, bend the grass away from you. This means the roller on your mower (or striping kit) should be behind the cutting blades, pushing the grass blades down and away from your current path.
- Subsequent Passes: Continue this pattern across your lawn. For each subsequent pass, turn at the end of the row and mow in the opposite direction. The key is to always bend the grass in the same direction relative to your mowing path. If you just mowed away from you on one line, your next pass (going the opposite way) will have the roller pushing grass away from you again.
Understanding the “Away” Principle
Let’s clarify the “bend the grass away from you” rule. Imagine you are walking with your mower.
- When you push the mower away from you: The roller is behind the blades, bending the grass away from your line of sight.
- When you pull the mower towards you: The roller is still behind the blades (relative to the direction of travel), but because you are moving backward, the grass is still being bent away from your current position.
The goal is to create alternating bands where the grass is either bent towards you or away from you.
Step 5: Rolling for Enhanced Stripes (Optional but Recommended)
If you have a separate lawn roller, you can use it after mowing for even sharper stripes.
- Roll in One Direction: Mow your entire lawn first. Then, attach your lawn roller and roll all your stripes in one consistent direction.
- Roll in the Opposite Direction: Once you’ve rolled in one direction, go back over your lawn with the roller in the opposite direction. This dual rolling action can help “set” the bends in the grass more firmly and create a more vibrant striped effect.
Important Note: Never roll a wet lawn. This can lead to soil compaction and damage the grass blades. Wait until the grass is dry.
Mastering Different Lawn Striping Patterns
Once you’ve mastered the basic parallel stripes, you can explore more creative lawn striping patterns.
Straight Parallel Stripes
This is the classic look. Mow back and forth in straight lines across your lawn.
Checkerboard Pattern
This is a popular and impressive design. It involves creating two sets of parallel stripes that are perpendicular to each other.
- First Set: Mow your parallel stripes in one direction (e.g., north-south).
- Second Set: Now, mow perpendicular to your first set (e.g., east-west). When you get to an un-mowed section, the grass will be bent towards or away from you based on your previous passes. You continue the pattern, bending the grass in the same relative way for each row of the second set.
Concentric Circles or Rings
This pattern is more advanced and often seen on sports fields. It involves mowing in a circular pattern, gradually moving inward or outward from a central point. This requires a lot of practice and precision.
Diamond Pattern
Similar to the checkerboard, but you mow diagonally across your lawn. This can create a dynamic and visually interesting effect.
Tips for Achieving Professional Lawn Stripes
To elevate your DIY lawn stripes to the level of professional lawn stripes, consider these advanced tips.
Grass Type Matters
Some grass types are naturally better suited for striping than others.
- Good for Striping: Fine fescues, perennial ryegrass, and some varieties of bluegrass are excellent for striping because their blades are relatively soft and bend easily.
- Less Ideal for Striping: Coarse grasses like tall fescue and some types of Zoysia can be more resistant to bending, making it harder to achieve sharp stripes.
Mowing Height and Frequency
- Optimal Height: Mowing at a slightly higher setting (around 2.5 to 3 inches) can make striping easier, as the longer blades bend more readily.
- Frequent Mowing: Regular mowing helps keep the grass healthy and encourages upright growth, which is crucial for good striping.
Mower Speed
Mowing at a slightly slower speed allows the striping kit or roller more time to effectively bend the grass blades. It also gives you better control for straighter lines.
The Power of a Reel Mower
As mentioned, reel mower stripes are often superior. If you are serious about achieving the best possible stripes, investing in a good quality reel mower can make a significant difference.
Pre-Mow Rolling
For extremely stubborn grass, some professionals will lightly roll the lawn in one direction before mowing. This can help pre-set the grass blades, making them more receptive to bending during the mowing process.
Post-Mow Rolling (Again)
A final pass with a lawn roller after all mowing is complete can really “lock in” the stripes and give them that extra pop.
Troubleshooting Common Striping Issues
Even with the best intentions, you might encounter a few snags. Here’s how to address them.
Faint Stripes
- Cause: Not enough grass blade bend, or the grass type is not ideal.
- Solution: Ensure your striping kit is properly adjusted. Mow at a slightly slower pace. Consider a post-mow roll. If using a rotary mower, a dedicated striping kit is essential.
Uneven or Wavy Stripes
- Cause: Uneven terrain, mower not cutting evenly, or inconsistent mowing paths.
- Solution: Ensure your mower is balanced and blades are sharp. Try to maintain a consistent distance from your previous stripe. If your lawn has significant slopes, it can be harder to get perfect stripes.
Stripes Disappearing After a Day
- Cause: Grass is too stiff and springs back up quickly.
- Solution: A good lawn roller is key here. Rolling the lawn after mowing can help set the blades. Some specialized lawn conditioners can also help.
The Benefits of Striped Lawns Beyond Aesthetics
While lawn stripes are visually appealing, they also contribute to a healthier lawn.
- Encourages Upright Growth: The process of bending the grass can encourage the blades to grow more upright, leading to a denser and healthier turf.
- Improved Airflow: A well-striped lawn often has a slightly more open canopy, which can improve airflow and reduce the risk of fungal diseases.
- Pride of Ownership: Let’s be honest, a striped lawn just looks good. It’s a clear sign of dedication and care, boosting curb appeal and personal satisfaction.
Lawn Stripes: A Summary of Best Practices
To recap, here are the core principles for achieving the best way to get lawn stripes:
- Healthy Grass: Start with a well-maintained, healthy lawn.
- Right Tools: Use a good mower and a quality striping kit or lawn roller.
- Consistent Technique: Mow in straight lines, always bending the grass in the same direction relative to your path.
- Slow and Steady: Mow at a moderate pace for optimal bending.
- Roll it Out: Use a lawn roller before or after mowing for enhanced stripes.
- Experiment: Don’t be afraid to try different lawn striping patterns to see what looks best on your lawn.
Whether you’re aiming for subtle elegance or bold statements, mastering the art of lawn stripes is a rewarding part of lawn care. With the right tools and techniques, you can transform your lawn into a visually stunning masterpiece.
Frequently Asked Questions About Lawn Stripes
Q1: Can I get lawn stripes with a regular rotary mower without a kit?
While some heavy-duty rotary mowers with well-designed deck and wheel configurations might produce very subtle stripes, it’s highly unlikely to achieve pronounced lawn stripes without a dedicated striping kit or a lawn roller. The kit’s roller is essential for bending the grass blades effectively.
Q2: How often should I stripe my lawn?
You can stripe your lawn every time you mow. However, for the best results, ensure your lawn is healthy and the grass is at an optimal height. Over-striping might stress the grass if done too aggressively or too frequently on an unhealthy lawn.
Q3: What is the best grass type for striping?
Fine fescues, perennial ryegrass, and Kentucky bluegrass are generally considered the best grass types for striping due to their blade structure, which bends easily and recovers well.
Q4: Do I need to use a lawn roller if I have a striping kit?
A striping kit is designed to bend the grass. A lawn roller complements this by further flattening and setting the bent blades, which can enhance the vibrancy and longevity of the stripes. It’s not strictly necessary if your striping kit is excellent, but it will likely improve the final result.
Q5: Can I stripe my lawn in wet conditions?
No, it is strongly advised not to mow or roll your lawn when it is wet. This can damage the grass blades, lead to soil compaction, and result in poor striping quality. Always wait until the grass is dry.
Q6: How do I create a checkerboard pattern?
To create a checkerboard pattern, you first mow parallel stripes in one direction. Then, you mow perpendicular to those stripes. The key is to maintain the grass-bending technique consistently for both sets of stripes, creating alternating light and dark bands in both directions.
Q7: Is there a specific time of day that’s best for striping?
The best time of day is often when the sun is at an angle, such as in the morning or late afternoon. This is when the contrast between the light-reflecting and light-absorbing grass blades is most apparent, making your stripes stand out. Midday sun, when it’s directly overhead, can wash out the contrast.