
To properly winterize your lawn mower this fall, you need to clean it thoroughly, add fuel stabilizer to the gas tank, run the engine to distribute the stabilized fuel, change the oil, sharpen and re-install the blade, lubricate moving parts, clean the mower deck, and store it in a dry, protected location. This comprehensive approach ensures your mower starts reliably and functions optimally come spring.
As the vibrant greens of summer fade and the crisp air of autumn arrives, it’s time to turn our attention to preparing our lawn equipment for the colder months ahead. Ignoring your lawn mower during the off-season is a common mistake that can lead to costly repairs and frustration when you’re eager to get back to mowing. Proper lawn mower maintenance is key to ensuring its longevity and performance. This guide will walk you through every step of mower preparation for winter storage, covering everything from engine care to battery maintenance.
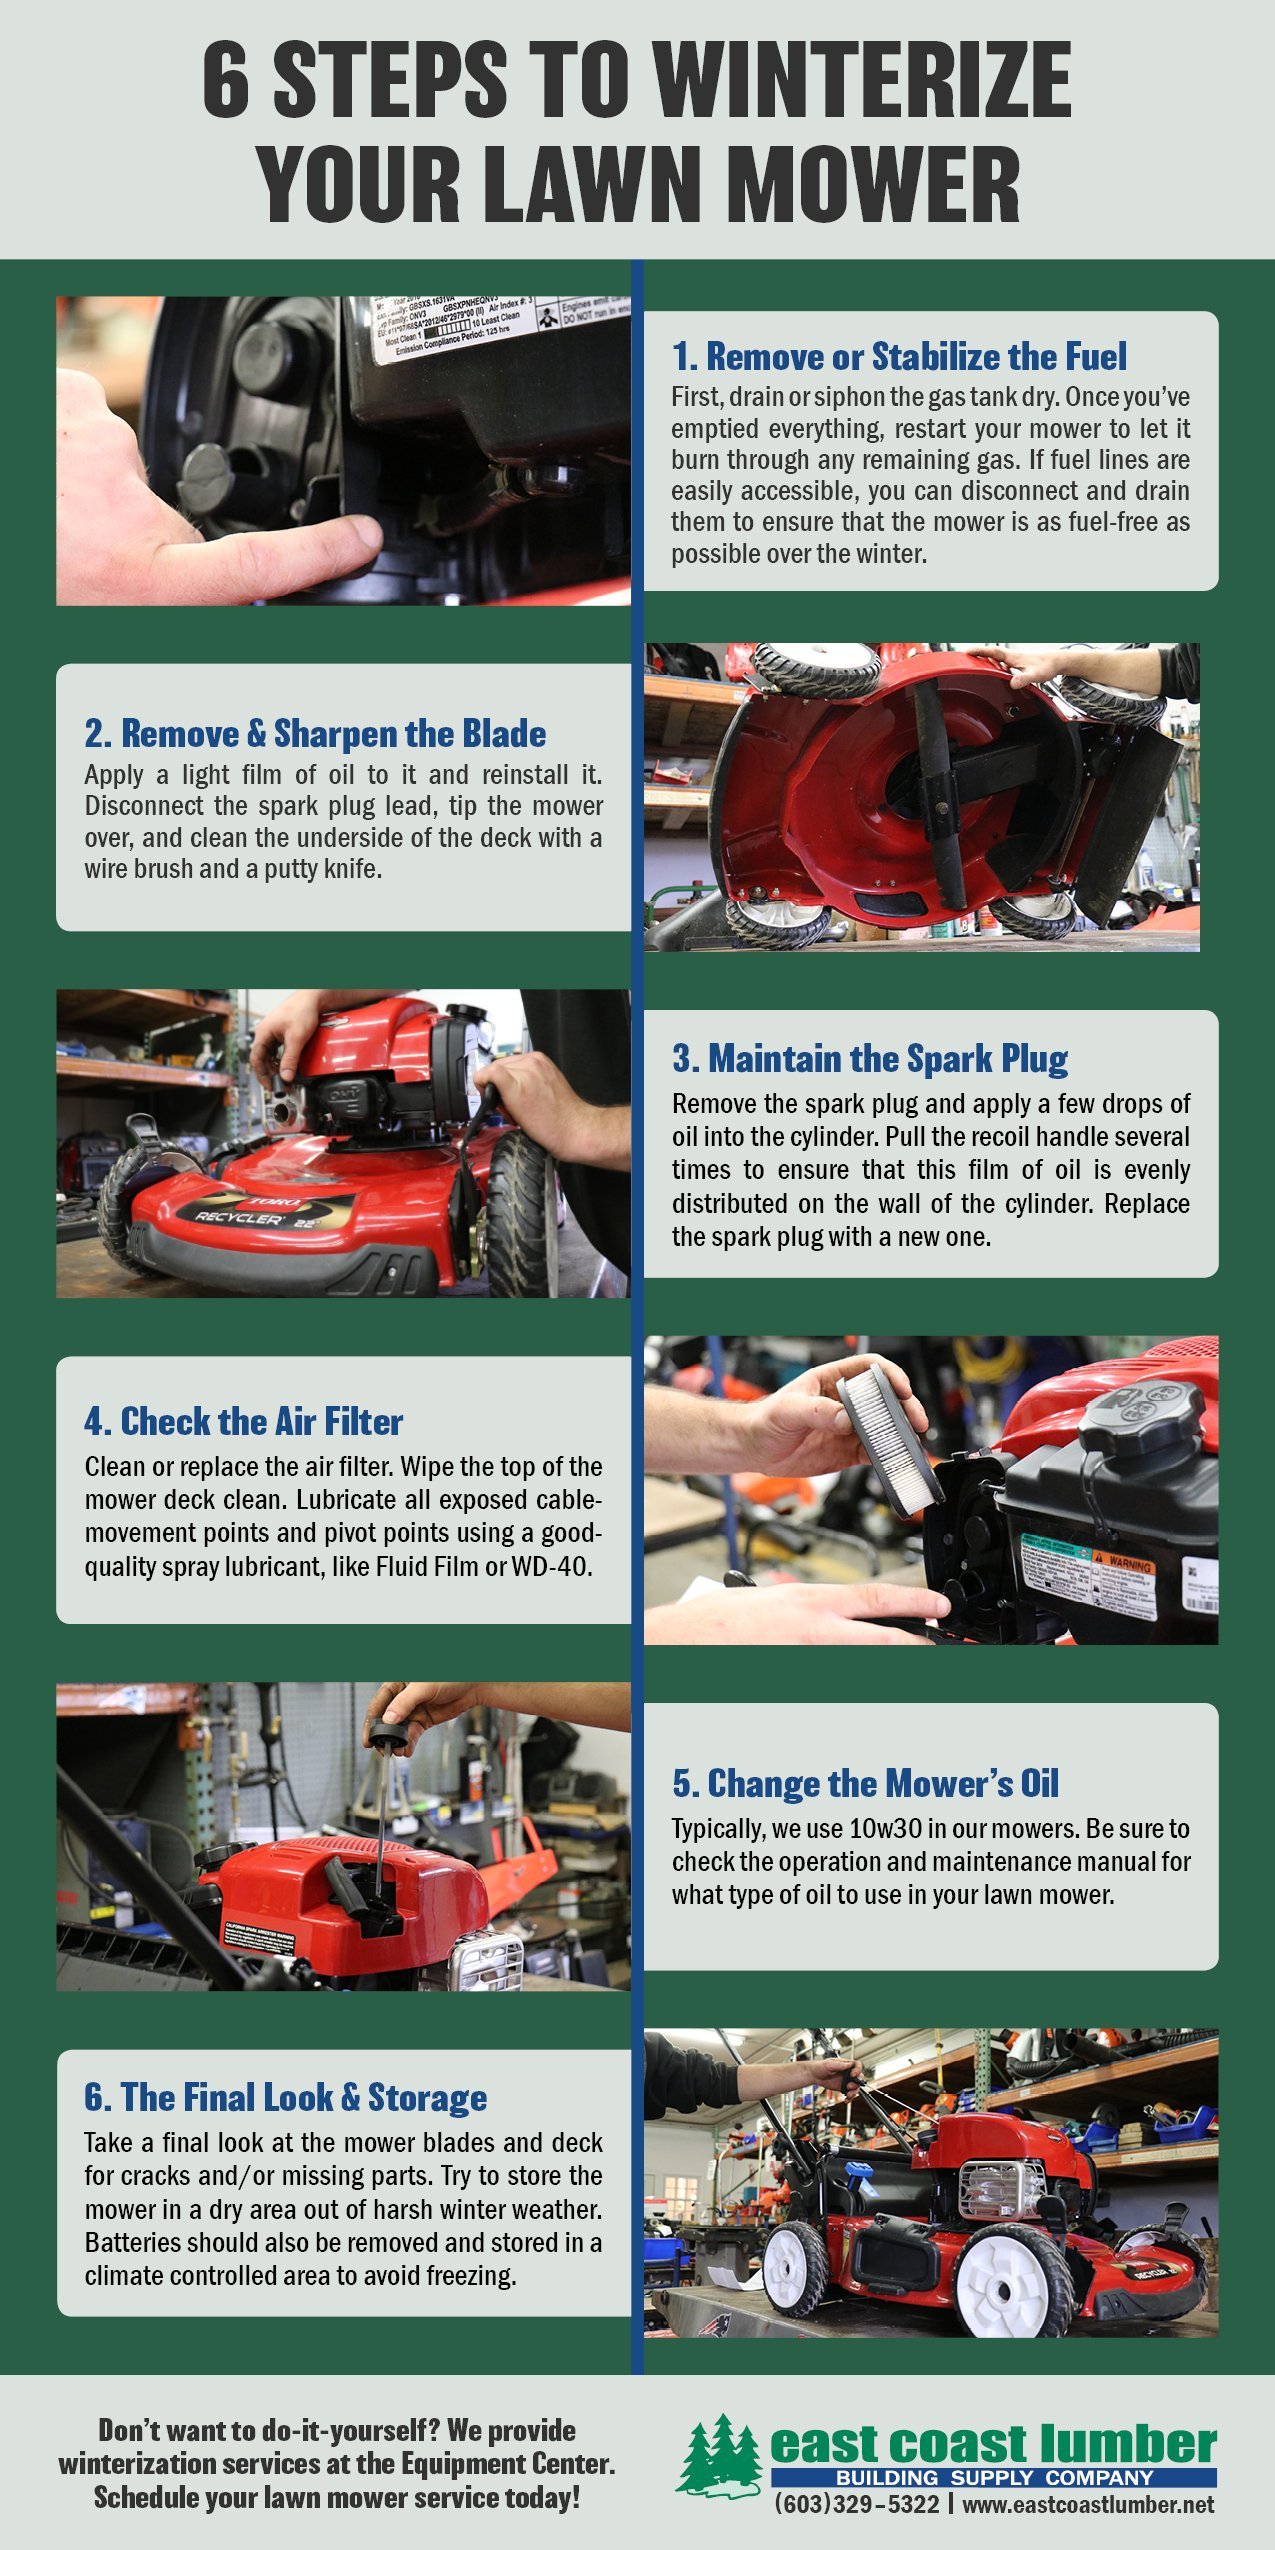
Image Source: irp-cdn.multiscreensite.com
Preparing Your Mower for the Cold: A Step-by-Step Guide
Taking a little time now will save you a lot of hassle later. Think of it as giving your mower a comfortable retirement package until its next active duty.
The Importance of Winterization
Why bother with all this effort? Winter can be harsh on machinery. Moisture, extreme temperature fluctuations, and stagnant fuel can all wreak havoc on your lawn mower. Winterizing helps prevent:
- Corrosion: Moisture can lead to rust on metal parts.
- Fuel Varnish: Stale gasoline breaks down, creating sticky residue that can clog the fuel system.
- Battery Degradation: Batteries left in cold conditions without proper care can lose their charge or become permanently damaged.
- Internal Engine Damage: Unstabilized fuel can cause internal issues over time.
By following these steps, you’re essentially giving your mower a spa treatment to ensure it’s in prime condition when the snow melts.
Step 1: The Big Clean-Up – Cleaning Your Mower
Before anything else, give your mower a thorough cleaning. This isn’t just about aesthetics; it’s crucial for preventing rust and identifying any potential issues.
Removing Grass Clippings and Debris
Grass clippings left to sit can hold moisture and promote rust. They can also impede airflow, causing the engine to overheat later.
- Tools you’ll need: A stiff brush, a garden hose, a putty knife or scraper, compressed air (optional).
- Process:
- Disconnect the spark plug: This is a critical safety step to prevent accidental starts.
- Tip the mower correctly: Most manufacturers recommend tipping the mower with the carburetor and air filter facing upwards to prevent oil and fuel from entering these components. Check your owner’s manual for specific instructions.
- Scrape away debris: Use a putty knife or scraper to gently remove caked-on grass and mud from the underside of the mower deck. Be careful not to scratch the paint too deeply.
- Brush away loose debris: Use a stiff brush to clear away any remaining grass, leaves, or dirt from the engine housing, wheels, and other surfaces.
- Rinse with a hose: Use a garden hose to wash away the remaining dirt. Avoid using a high-pressure washer directly on the engine or electrical components, as this can force water into sensitive areas.
- Dry thoroughly: Use a clean cloth or towels to dry the mower completely. Compressed air can be helpful for drying hard-to-reach areas.
Deck Care: Protecting the Underside
The mower deck is particularly prone to rust because it’s constantly exposed to moisture and abrasive grass clippings.
- Cleaning the deck: As mentioned above, scrape and brush the underside of the deck.
- Rust prevention: After drying, you can apply a light coat of a protective spray, like a silicone spray or a specific mower deck protectant, to the underside of the deck to help prevent rust.
Step 2: Fuel System Protection – The Heart of Engine Care
Stale fuel is a mower’s worst enemy during the off-season. This is where engine care truly shines.
Adding Fuel Stabilizer
Fuel stabilizer prevents gasoline from breaking down and forming gum and varnish deposits.
- Why it’s important: Modern gasoline, especially ethanol-blended fuel, degrades relatively quickly. Over a few months, it can turn into a sticky mess that clogs fuel lines, filters, and the carburetor.
- How to use it:
- Purchase a quality fuel stabilizer: Look for brands specifically designed for small engines.
- Determine the correct amount: Follow the instructions on the stabilizer bottle. Usually, you add a specific amount per gallon of fuel.
- Add to the tank: Pour the recommended amount of stabilizer into your lawn mower’s fuel tank.
- Run the engine: Start the mower and let it run for about 5-10 minutes. This ensures the stabilized fuel circulates through the entire fuel system, including the carburetor.
Carburetor Draining: An Extra Layer of Protection
For some older mowers or if you live in a very humid climate, draining the carburetor might be an extra precaution.
- Why drain the carburetor? This removes any residual fuel that could still gum up the small jets inside.
- How to drain the carburetor:
- Locate the drain screw: Most carburetors have a small screw or nut at the lowest point. Consult your owner’s manual if you can’t find it.
- Place a container underneath: Have a small, approved container ready to catch any fuel.
- Loosen the screw: Carefully loosen the drain screw. Fuel should flow out.
- Tighten the screw: Once the fuel has drained, tighten the screw back up.
Note: For many modern mowers with fuel injection systems or those where you’ve used sufficient fuel stabilizer and run the engine, draining the carburetor might not be strictly necessary. However, it’s a good practice if you want to be absolutely certain.
Step 3: Oil Change – Vital for Engine Longevity
Fresh oil is crucial for protecting the engine’s internal components during storage.
- Why change the oil? Used oil contains contaminants and acids that can corrode engine parts over time. Fresh oil provides optimal lubrication and protection.
- When to do it: It’s best to change the oil when the engine is warm, as the oil flows more easily.
- How to do it:
- Warm up the engine: Run the mower for a few minutes to warm the oil.
- Disconnect the spark plug: Safety first!
- Position a drain pan: Place a suitable container under the oil drain plug. Consult your owner’s manual to locate the drain plug. Some mowers might require tipping or have a drain hose.
- Remove the drain plug: Use the correct size wrench to remove the plug.
- Drain the old oil: Let all the old oil drain completely.
- Replace the drain plug: Once drained, re-insert and tighten the drain plug.
- Add fresh oil: Using the correct type and amount of oil specified in your owner’s manual, add fresh oil through the oil fill cap. Do not overfill.
- Check the oil level: Use the dipstick to ensure the oil level is correct.
Step 4: Blade Care – Sharpness for Spring
A dull blade tears grass, leading to unhealthy lawns and making your mower work harder.
Blade Sharpening
- Why sharpen? A sharp blade cuts grass cleanly, promoting faster healing and reducing disease. It also means less strain on the engine.
- How to sharpen:
- Remove the blade: With the spark plug disconnected, carefully tilt the mower (again, check your manual for the correct position) and use a wrench to remove the blade bolts. Remember which side faces up.
- Use a file or grinder: You can use a metal file, a bench grinder, or a specialized blade sharpening tool.
- Sharpen the cutting edge: Work at an angle that matches the original bevel of the blade. Aim to remove metal from the dull side.
- Check for balance: Use a blade balancer (a simple cone-shaped tool) to ensure the blade is balanced. An unbalanced blade can cause excessive vibration, damaging the mower. File a small amount of metal from the heavier side until it balances.
- Re-install the blade: Re-attach the blade with the sharpened edge facing down, ensuring it’s securely tightened.
Blade Inspection
While the blade is off, inspect it for any damage, such as nicks, bends, or cracks. If the blade is significantly damaged, it’s best to replace it.
Step 5: Battery Maintenance – Keeping the Spark Alive
If your mower has an electric start, its battery needs attention.
- Why is battery maintenance important? Cold temperatures can reduce battery efficiency, and batteries naturally lose their charge over time.
- Steps for battery maintenance:
- Clean the terminals: Remove any corrosion from the battery terminals using a wire brush and a mixture of baking soda and water. Rinse and dry thoroughly.
- Charge the battery: Fully charge the battery using an appropriate battery charger.
- Disconnect the battery: For long-term storage, it’s often best to disconnect the battery from the mower.
- Store in a cool, dry place: Store the battery in a temperature-stable environment. Avoid extreme cold or heat.
- Periodically check charge: If storing for an extended period, check the battery’s charge every 1-2 months and recharge as needed. Some trickle chargers or battery maintainers are designed to keep the battery topped up without overcharging.
Step 6: Lubrication and Greasing – Ensuring Smooth Operation
Moving parts need protection from seizing up.
- Lubricate pivot points: Apply a light coat of oil or grease to any pivot points, such as those for the handle height adjustment or wheel height adjustments.
- Check grease fittings: If your mower has grease fittings (zerks), clean them and apply fresh grease with a grease gun.
Step 7: Final Checks and Storage Location
You’re almost there! A few final details before tucking your mower away.
Inspecting Belts and Hoses
- Check for wear: Look at the drive belts and any hoses for signs of cracking, fraying, or wear. Replace any that look compromised.
Air Filter Check
- Clean or replace: While you’ve been cleaning, it’s a good time to check the air filter. If it’s a paper filter, tap it gently to remove dust. If it’s very dirty or clogged, it’s best to replace it. Foam filters can often be washed, dried, and lightly oiled.
Finding the Perfect Spot: Winter Storage
Where you store your mower can make a big difference.
- Ideal location: A dry, sheltered place like a garage, shed, or covered porch is best.
- Avoid dampness: Basements can be damp, so ensure good ventilation if that’s your only option.
- Protect from elements: Even in a garage, consider covering your mower with a mower cover or an old tarp to protect it from dust and accidental bumps.
- Keep away from heat sources: Avoid storing the mower near furnaces or water heaters, as excessive heat can be detrimental to fuel and rubber components.
Summary Table for Quick Reference
Here’s a quick overview of the key winterization tasks:
| Task | Description | Why It’s Important |
|---|---|---|
| Clean Mower | Remove grass, dirt, and debris from all parts, especially the deck underside. | Prevents rust, improves engine cooling, and allows for inspection. |
| Fuel System | Add fuel stabilizer and run the engine, or drain the fuel system. | Prevents fuel degradation, varnish formation, and clogged fuel lines/carburetor. |
| Change Oil | Drain old oil and refill with fresh, recommended oil. | Protects internal engine components from corrosion and wear during storage. |
| Blade Sharpening | Remove the blade, sharpen the cutting edge, and balance it. | Ensures a clean cut for a healthier lawn and reduces engine strain in the spring. |
| Battery Maintenance | Clean terminals, charge, and disconnect if storing for a long period. | Maintains battery charge and prevents damage from cold temperatures. |
| Lubrication | Apply oil or grease to pivot points and moving parts. | Prevents parts from seizing and ensures smooth operation. |
| Inspect Components | Check belts, hoses, and air filter for wear or damage. | Identifies potential issues before they cause problems. |
| Winter Storage | Store in a dry, sheltered location away from extreme temperatures and moisture. | Protects the mower from the elements and extends its lifespan. |
Frequently Asked Questions (FAQ)
How long can I leave gas in my lawn mower over winter?
It’s generally not recommended to leave untreated gasoline in your lawn mower for more than 30 days. Beyond that, it starts to break down, leading to the problems mentioned earlier. Using a fuel stabilizer is the best way to manage fuel for long-term storage.
Do I need to drain the gas tank completely?
You don’t necessarily need to drain the gas tank completely if you use a fuel stabilizer. Adding stabilizer and running the engine until it circulates through the system is sufficient for most situations. Draining the tank is an extra step some people take for added peace of mind, especially in very humid climates.
Can I store my lawn mower outside?
It’s highly discouraged. Even with a cover, outdoor storage exposes your mower to temperature extremes, moisture, and potential damage from animals or falling debris. A garage or shed is always the best option.
How often should I sharpen my lawn mower blade?
Ideally, you should sharpen your lawn mower blade at least once per season. If you have a very large lawn or notice the cut quality degrading, you might need to sharpen it more frequently.
What kind of oil should I use in my lawn mower?
Always consult your lawn mower’s owner’s manual for the recommended type and viscosity of oil. Common recommendations are SAE 30 or 10W-30, depending on the engine and climate.
My mower has a fuel-injected engine. Do I still need to worry about fuel stabilization?
Yes, even fuel-injected engines benefit from fuel stabilization. While they don’t have a carburetor to gum up, the fuel in the tank and lines can still degrade, leading to poor performance or starting issues when you bring it out of storage.
By following these detailed steps, you can ensure your lawn mower is ready to tackle your lawn with vigor when spring arrives, saving you time, money, and frustration. Happy winterizing!