
Does your lawn mower struggle to cut grass cleanly? Do you notice ragged edges on your lawn after mowing? These could be signs that your lawn mower blade needs attention. You should replace your lawn mower blade when it is visibly damaged, significantly worn down, or after approximately 25-50 hours of use. However, this is a general guideline, and the actual frequency depends on several factors. This guide will delve into everything you need to know about lawn mower blade replacement, sharpening, and maintenance to keep your mower running efficiently and your lawn looking its best.
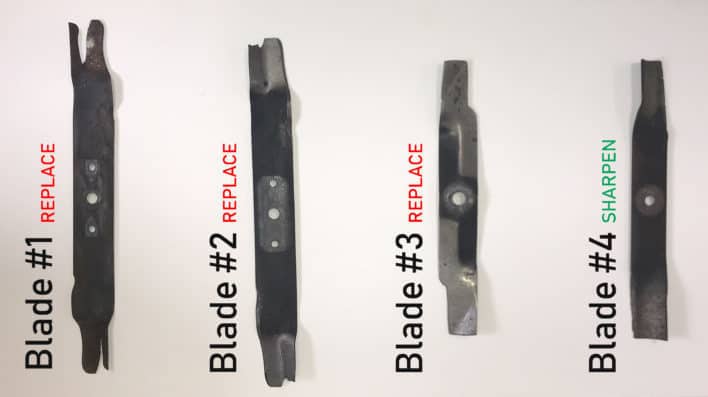
Image Source: minnesotaequipment.com
The Importance of a Sharp Mower Blade
A sharp mower blade is crucial for a healthy lawn. When your blade is sharp, it cleanly cuts grass blades. This clean cut allows the grass to heal quickly, reducing the risk of disease and stress. Conversely, dull mower blades tear and rip the grass. This ragged cut leaves the grass vulnerable to pests, diseases, and drought. It also gives your lawn a chewed-up, unhealthy appearance, often appearing brown or yellowish.
Benefits of Sharp Blades:
- Healthier Grass: Clean cuts promote faster healing and reduce stress on the grass.
- Improved Lawn Appearance: A sharp blade results in a clean, even cut, giving your lawn a manicured look.
- Reduced Disease Risk: Damaged grass is more susceptible to fungal infections and other diseases.
- Increased Mowing Efficiency: Sharp blades cut through grass with less effort, making your mower work more effectively.
- Less Strain on the Mower: A dull blade forces the engine to work harder, potentially shortening its lifespan.
When to Sharpen or Replace Your Mower Blade
Knowing when to sharpen or replace your mower blade is key to proper lawn care. Don’t wait until your mower is completely struggling. Regular checks and maintenance will save you time, effort, and potentially costly repairs down the line.
Signs of a Dull Blade:
- Ragged Grass Edges: This is the most obvious sign. If the tips of your grass blades appear torn, shredded, or brown after mowing, your blade is likely dull.
- Yellowing or Browning Lawn: Even if you’re watering correctly, a dull blade can stress your grass, leading to a yellow or brown appearance.
- Uneven Cutting: The mower leaves streaks or patches of uncut grass.
- Increased Mower Vibration: A dull or unbalanced blade can cause the mower to vibrate excessively, which can be felt through the handles.
- Visible Nicks and Dents: Small imperfections on the blade can quickly lead to tearing rather than cutting.
- Slower Cutting Speed: You find yourself having to push the mower slower to achieve a semblance of a clean cut.
Determining When to Sharpen Mower Blades:
The decision between sharpening lawn mower blades and replacing them depends on the extent of wear and damage.
- Light Dullness: If the blades are just slightly dulled but not significantly nicked or bent, sharpening is usually sufficient.
- Moderate Wear: If the cutting edge is rounded but there’s no major damage, sharpening can restore its effectiveness.
- Significant Damage: If the blade has large nicks, chips, bends, or cracks, replacement is the safer and more effective option.
Frequency of Blade Replacement and Maintenance Schedule
Establishing a regular lawn mower maintenance schedule is essential for longevity and performance. This includes checking and maintaining the blade.
General Guidelines for Blade Replacement:
The mower blade lifespan varies greatly. However, a good rule of thumb is to inspect your blade after every 25-50 hours of mowing.
- Residential Use: For homeowners with average-sized lawns, a blade might need sharpening every 20-25 hours of mowing. Replacement might be necessary after 1-2 seasons of regular use, depending on care.
- Commercial Use: Professional landscapers who mow frequently and often in demanding conditions may need to sharpen blades weekly or bi-weekly and replace them more often, perhaps every season or even more.
- Mowing Conditions: Mowing dry, sandy soil or areas with hidden debris will wear down blades faster than mowing clean, moist soil.
Factors Affecting Blade Lifespan:
- Type of Grass: Some grasses are tougher to cut than others.
- Mowing Frequency: More frequent mowing means more wear.
- Terrain: Hilly or uneven terrain can lead to more contact with the ground.
- Debris in Lawn: Rocks, sticks, and sand significantly accelerate blade wear and can cause damage.
- Blade Quality: Higher quality blades are often made of tougher steel and will last longer.
- Sharpening Technique: Improper sharpening can actually dull the blade or damage its temper.
How to Tell If Mower Blade is Worn
Beyond visual inspection, there are subtle indicators that your mower blade is worn and may need replacement.
Indicators of a Worn Blade:
- Rounded Cutting Edge: Instead of a sharp edge, you’ll see a rounded, blunt surface.
- Thinning of the Blade: Over many sharpenings, the blade can become thinner, making it more prone to bending or breaking.
- Cracks or Fractures: Any visible cracks are a clear sign that the blade is compromised and needs immediate replacement.
- Unbalanced Blade: A worn or damaged blade can become unbalanced, leading to excessive vibration. This is dangerous and can damage the mower’s spindle and engine.
When to Replace a Mower Blade:
- After Numerous Sharpenings: While a blade can be sharpened many times, each sharpening removes a small amount of metal. Eventually, the blade will become too thin or misshapen to be effective.
- When Damage is Severe: If the blade has significant chips, bends, cracks, or holes, it’s time for a new one.
- If Performance Doesn’t Improve After Sharpening: If you sharpen the blade and still experience poor cutting performance, it’s likely worn beyond its useful life.
The Best Time to Replace Mower Blade
There isn’t one single “best” time, but strategically replacing your mower blade can be more efficient.
Strategic Replacement Times:
- Before the Mowing Season: Get your mower ready for the demands of spring by installing a fresh, sharp blade. This ensures optimal performance from the start.
- After Significant Damage: If you hit a rock or other hard object and suspect damage, inspect and replace the blade immediately. Don’t wait.
- When You Notice Performance Decline: Don’t delay if you see the signs of a dull or worn blade. Address it promptly to maintain lawn health.
- During Routine Maintenance: Incorporate blade inspection and potential replacement into your broader lawn mower maintenance schedule.
Replacing Your Lawn Mower Blade: A Step-by-Step Process
Replacing a lawn mower blade is a manageable DIY task if you have the right tools and follow safety precautions.
Safety First!
- Disconnect the Spark Plug: This is the most crucial step to prevent accidental starting. Pull the spark plug wire away from the plug.
- Wear Thick Gloves: Mower blades are extremely sharp, even when dull. Protect your hands.
- Wear Eye Protection: Debris can fly when removing or installing the blade.
- Secure the Mower: Ensure the mower is on a stable, level surface.
Tools You’ll Need:
- Wrench or Socket Set: To remove the blade mounting bolt.
- Block of Wood: To wedge under the blade and prevent the mower deck from turning.
- New Mower Blade: Ensure it’s the correct replacement for your mower model.
- Torque Wrench (Recommended): To tighten the bolt to the manufacturer’s specification.
- Wire Brush: To clean the blade mounting area.
- Gloves and Eye Protection.
Steps for Replacement:
- Prepare the Mower: Ensure the mower is off, cool, and on a flat surface. Crucially, disconnect the spark plug wire.
- Tilt the Mower (Optional but Recommended): Tilt the mower back so the carburetor is not submerged in fuel and the air filter is facing upwards. This prevents fuel and oil leaks.
- Locate and Secure the Blade: Wedge a block of wood firmly between the blade and the mower deck to prevent it from spinning.
- Remove the Blade Bolt: Use the appropriate wrench or socket to loosen and remove the bolt that holds the blade in place. The bolt is usually a standard hex bolt or a carriage bolt with a hex nut. Turn counter-clockwise to loosen.
- Remove the Old Blade: Carefully slide the old blade off the mower spindle. Note the orientation of the blade (which side faces up).
- Inspect the Spindle and Deck: Clean any grass clippings or debris from the spindle area using a wire brush. Check for any damage to the spindle or the mower deck.
- Install the New Blade: Position the new blade onto the spindle in the correct orientation. The “lift” or “sail” side of the blade (the curved part) should face upwards, towards the mower deck. This is what creates the vacuum to pull grass up for a clean cut.
- Reinstall the Blade Bolt: Thread the bolt back into the spindle.
- Tighten the Blade Bolt: Tighten the bolt securely. If you have a torque wrench, tighten it to the manufacturer’s specified torque. Over-tightening can damage the spindle, while under-tightening can lead to the blade coming loose, which is very dangerous. Generally, 50-75 ft-lbs is a common range, but always check your manual.
- Remove the Block of Wood.
- Reconnect the Spark Plug Wire.
- Test the Mower: Start the mower briefly to ensure everything sounds normal and there are no excessive vibrations.
Sharpening Lawn Mower Blades: A Guide
Sharpening is a viable alternative to replacement for moderately dull blades.
Tools for Sharpening:
- Bench Grinder or Angle Grinder: For efficient sharpening.
- Metal File: For fine-tuning and removing burrs.
- Vise: To hold the blade securely.
- Wrench/Socket Set: To remove the blade.
- Gloves and Eye Protection.
- Balancing Tool: Crucial for ensuring the blade is balanced after sharpening.
Sharpening Steps:
- Safety First: Disconnect the spark plug and wear protective gear.
- Remove the Blade: Follow steps 1-5 from the replacement section.
- Secure the Blade: Clamp the blade securely in a vise.
- Sharpen the Cutting Edge:
- Bench Grinder/Angle Grinder: Hold the blade at the original angle (usually around 30-45 degrees) and gently move it across the grinding wheel. Grind from the center of the blade towards the tip. Avoid overheating the metal, which can weaken it. Work in short bursts.
- Metal File: Use a sturdy metal file and draw it along the cutting edge at the original bevel angle. Make firm, consistent strokes.
- Deburr the Blade: Use the file or a sharpening stone to remove any burrs or rough edges left by the grinding.
- Balance the Blade: This is critical. Use a blade balancing tool to check if the blade is evenly weighted. If one side is heavier, grind a small amount of metal from the heavier side until it balances. An unbalanced blade causes vibration and can damage your mower.
- Reinstall the Blade: Follow steps 7-11 from the replacement section.
When Not to Sharpen: Recognizing the Limits
While sharpening lawn mower blades can save money and extend their life, there are times when replacement is the only sensible option.
Blade Condition Demanding Replacement:
- Cracks or Fractures: Any sign of a crack, no matter how small, compromises the blade’s structural integrity. A blade can break apart during operation, causing serious injury and mower damage.
- Significant Bends or Warping: If the blade is severely bent or warped from hitting an object, it will be very difficult, if not impossible, to balance correctly. A bent blade will also cut unevenly.
- Excessive Thinning: If the blade has been sharpened many times and appears noticeably thin, it’s nearing the end of its useful life. Thin blades are more prone to bending and breaking.
- Major Nicks or Gouges: While minor nicks can be ground out, large, deep gouges will remove too much metal, making it difficult to maintain the correct blade angle and sharpness.
- Multiple Repair Attempts: If you’ve sharpened the blade multiple times and it still doesn’t cut well, or if it seems to dull quickly, it’s time for a new one.
Maintaining Your Mower for Longevity
Beyond the blade, proper lawn mower maintenance schedule includes other essential tasks.
Key Maintenance Tasks:
- Clean the Mower Deck: After each use, clear grass clippings from under the deck. This prevents rust and ensures better airflow.
- Check Oil Levels: Ensure the oil is at the correct level before each use and change it according to the manufacturer’s recommendations.
- Replace Air Filter: A clean air filter allows the engine to breathe properly. Replace it annually or as needed.
- Inspect Spark Plug: Clean or replace the spark plug as part of routine maintenance.
- Fuel System Care: Use fresh fuel and consider a fuel stabilizer, especially during off-season storage.
- Lubricate Moving Parts: Keep pivot points and other moving parts lubricated.
Frequently Asked Questions (FAQ)
Q1: How often should I sharpen my lawn mower blade?
A1: You should inspect your lawn mower blade regularly. For average residential use, sharpening might be needed every 20-25 hours of mowing. Signs like ragged grass edges are a good indicator.
Q2: Can I sharpen my lawn mower blade myself?
A2: Yes, you can sharpen your lawn mower blade yourself using tools like a bench grinder, angle grinder, or a metal file, provided you have the necessary safety precautions and a blade balancing tool.
Q3: What happens if I don’t replace or sharpen my mower blade?
A3: Using a dull mower blade will tear your grass, making it prone to disease, browning, and an unhealthy appearance. It also puts more strain on your mower’s engine.
Q4: How do I know if my mower blade is worn out and needs replacing?
A4: Signs of a worn-out blade include a rounded cutting edge, visible cracks, severe bends, excessive thinning from repeated sharpening, or if performance doesn’t improve after sharpening.
Q5: What is the best time to replace a mower blade?
A5: The best times are before the start of the mowing season, immediately after you notice significant damage, or when you observe a consistent decline in cutting performance.
Q6: How tight should a mower blade bolt be?
A6: It’s best to use a torque wrench and tighten it to your mower’s manual specification. Typically, this is between 50-75 ft-lbs, but always check your specific model’s requirements.
Q7: How can I tell if a mower blade is worn?
A7: Look for a rounded, blunt cutting edge instead of a sharp one. Also, check for thinning of the metal, cracks, or significant nicks.
By following this comprehensive guide, you can ensure your lawn mower’s blade is always in optimal condition, leading to a healthier lawn and a more efficient, longer-lasting mower. Regular inspection, timely sharpening, and prompt replacement when necessary are the pillars of good lawn mower maintenance.