
Can I revive a brown lawn? Yes, you absolutely can bring your lawn back to life and restore a brown lawn to its former green glory. This comprehensive guide will walk you through the steps to revive your yard and achieve a lush, healthy green lawn. We’ll cover everything from diagnosing the problem to implementing a restoration plan and maintaining your lawn for years to come.
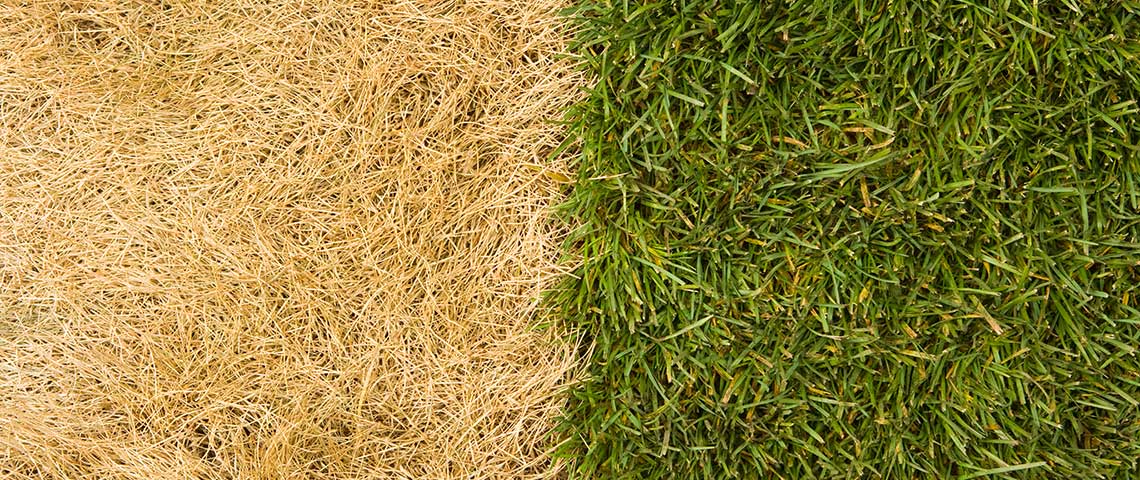
Image Source: www.pennington.com
Revive Your Yard: A Step-by-Step Approach
A struggling lawn can be disheartening, but with the right approach, you can achieve significant lawn recovery. Whether your grass is patchy, brown, or generally unhealthy, these lawn care tips will help you transform your yard.
Step 1: Diagnose the Decline
Before you can fix your lawn, you need to know why it’s struggling. Several factors can lead to a sad-looking yard. Common culprits include:
- Watering Issues: Too little or too much water can harm grass.
- Nutrient Deficiencies: Lack of essential nutrients stunts growth and weakens the grass.
- Pests and Diseases: Grubs, chinch bugs, fungi, and other invaders can wreak havoc.
- Soil Compaction: Hardened soil prevents water, air, and nutrients from reaching the roots.
- Thatch Buildup: A thick layer of dead organic matter smothers the grass.
- Sunlight Deprivation: Too much shade can weaken certain grass types.
- Improper Mowing: Cutting grass too short or with dull blades damages it.
- Weed Competition: Weeds steal resources from your grass.
Action: Walk your lawn. Look for discolored patches, bare spots, insect activity, or signs of disease. Feel the soil; is it hard and dry, or waterlogged?
Step 2: Soil Testing for a Strong Foundation
Healthy grass starts with healthy soil. A soil test is crucial for understanding your lawn’s specific needs. It will tell you about your soil’s pH level and its nutrient content (nitrogen, phosphorus, potassium, and micronutrients).
Why Soil Testing Matters:
- Precise Fertilization: You’ll know exactly which nutrients your lawn needs, preventing over or under-fertilization.
- pH Adjustment: Grass thrives within a specific pH range. A test helps you adjust it if necessary.
- Targeted Amendments: You’ll learn if your soil needs organic matter or other additions.
How to Get a Soil Test:
- Collect Samples: Take several soil samples from different areas of your lawn, about 3-4 inches deep. Avoid areas that have recently been fertilized or treated.
- Mix Samples: Combine the samples in a clean bucket.
- Send to Lab: Most local agricultural extension offices offer soil testing services. You can also purchase home soil test kits, though lab tests are generally more accurate.
- Interpret Results: The lab will provide a report with recommendations for your specific lawn.
Step 3: Addressing Immediate Concerns: Watering and Weeds
Once you have a general idea of the problem, tackle the most pressing issues.
Watering Wisely
Proper watering is key to lawn recovery.
- How Much? Most lawns need about 1 to 1.5 inches of water per week, including rainfall.
- When? Water deeply and infrequently. Early morning is the best time, before the heat of the day. This allows the grass to absorb water and reduces evaporation and disease risk.
- How to Measure: Place a rain gauge or a few empty tuna cans on your lawn while watering to see how much water you’re applying.
Weed Control
Weeds compete with grass for water, nutrients, and sunlight.
- Hand-Pulling: For small infestations, hand-pulling weeds (roots and all) is effective.
- Herbicides: Choose the right herbicide for the type of weeds you have. Read and follow label instructions carefully. Some herbicides are pre-emergent (preventing weed seeds from germinating), while others are post-emergent (killing existing weeds).
Step 4: Preparing for Lawn Rejuvenation
Before you can reseed or lay sod, you need to prepare the existing lawn. This is a critical step for successful lawn rejuvenation.
Dethatching
Thatch is a layer of dead and living grass stems, roots, and debris that builds up between the green grass and the soil surface. A thatch layer thicker than half an inch can be problematic.
Why Dethatch?
- Improves Air and Water Penetration: Reduces compaction and allows essential elements to reach the soil.
- Enhances Nutrient Uptake: Fertilizers and water can reach the roots more effectively.
- Reduces Thatch-Dwelling Pests: Many damaging insects and diseases thrive in thick thatch.
How to Dethatch:
- Power Rake (Scarifier): This machine has rotating tines that dig into the thatch layer and pull it to the surface. This is the most effective method for heavy thatch.
- Dethatching Rake: A manual rake with stiff tines can be used for smaller areas or lighter thatch.
Timing: Dethatching is best done when your grass is actively growing, typically in the spring or fall.
Aeration
Aeration involves creating small holes in the soil to relieve compaction and improve air, water, and nutrient circulation.
Why Aerate?
- Combats Soil Compaction: Essential for turf health, especially in high-traffic areas.
- Improves Root Growth: Roots can penetrate deeper into the soil.
- Enhances Water and Nutrient Uptake: Water and fertilizer reach the root zone more easily.
- Reduces Thatch: Small amounts of thatch are brought to the surface, aiding decomposition.
How to Aerate:
- Core Aerator: This machine pulls out small plugs of soil, leaving them on the surface to decompose. This is the most beneficial type of aeration.
- Spike Aerator: While easier to use, spike aerators can sometimes compact the soil further around the holes.
Timing: Like dethatching, aeration is best performed when the grass is actively growing, usually in the spring or fall.
Step 5: Repairing Patchy Lawn and Filling Bare Spots
A patchy lawn is a common sight, but it can be fixed.
Overseeding
Overseeding is the process of planting grass seed over an existing lawn. It’s a great way to thicken your lawn, fill in bare patches, and introduce more disease-resistant grass varieties.
When to Overseed:
- Fall: This is often the ideal time for overseeding cool-season grasses (like Kentucky bluegrass, fescues, and ryegrass). The cooler temperatures and ample moisture promote germination.
- Spring: Can also be done in spring, but weeds can be a greater competition.
How to Overseed:
- Prepare the Lawn: After dethatching and aerating, lightly rake the area to loosen the soil surface.
- Choose the Right Seed: Select a grass seed mix that is suited to your climate, soil type, and the amount of sunlight your lawn receives. Look for high-quality seed blends with good disease resistance.
- Apply Seed: Spread the seed evenly across the lawn. Use a spreader for consistent coverage. Follow the seeding rate recommended on the seed bag.
- Rake Lightly: Gently rake the seed into the top half-inch of soil to ensure good seed-to-soil contact.
- Water Consistently: Keep the seeded area consistently moist until the seeds germinate and the new grass is established. This often means light watering several times a day.
- Mow Carefully: Once the new grass reaches about 3 inches, you can mow it. Raise your mower blade to the highest setting for the first few mows to encourage deeper root growth.
Repairing Specific Bare Spots
For small, stubborn bare patches:
- Loosen Soil: Scrape away any dead grass and debris. Loosen the soil with a rake.
- Add Topsoil: If the soil is poor, add a thin layer of good quality topsoil.
- Seed: Sprinkle grass seed into the loosened soil.
- Cover: Lightly cover the seed with a thin layer of peat moss or straw to retain moisture and protect the seed.
- Water: Keep the area consistently moist until the grass is established.
Step 6: Fertilization for Lush Growth
Fertilizing provides the essential nutrients your lawn needs to thrive and recover.
Types of Fertilizers:
- Nitrogen (N): Promotes green, leafy growth.
- Phosphorus (P): Aids in root development and seedling growth.
- Potassium (K): Improves overall plant health, stress tolerance, and disease resistance.
Choosing a Fertilizer:
- Soil Test Recommendations: This is your best guide.
- N-P-K Ratio: The numbers on the bag represent the percentage of nitrogen, phosphorus, and potassium.
- Slow-Release vs. Quick-Release: Slow-release fertilizers provide nutrients over a longer period, reducing the risk of burning the grass and requiring fewer applications.
When to Fertilize:
- Cool-Season Grasses: Fertilize in the fall and spring. A fall application is particularly important for root development.
- Warm-Season Grasses: Fertilize in late spring and summer.
Application: Use a spreader for even application. Read and follow the manufacturer’s instructions to avoid over-fertilizing, which can damage the lawn.
Step 7: Ongoing Lawn Maintenance for Lasting Health
Once you’ve revived your lawn, consistent lawn maintenance is crucial to keep it looking its best and prevent future problems.
Mowing Techniques
Proper mowing is a cornerstone of good lawn care.
- Mow High: Set your mower to the highest recommended height for your grass type. Taller grass shades out weeds, encourages deeper root growth, and helps the lawn withstand drought.
- The One-Third Rule: Never remove more than one-third of the grass blade in a single mowing. Cutting too much at once stresses the grass.
- Sharp Blades: Dull mower blades tear grass, leaving it vulnerable to disease and giving it a ragged, brown appearance. Sharpen your blades regularly.
- Mulch Clippings: Leave grass clippings on the lawn (unless they are excessively long). They decompose and return valuable nutrients to the soil.
Watering Practices (Continued)
- Deep and Infrequent: Continue to water deeply and less often to encourage strong root systems.
- Monitor Conditions: Adjust watering based on weather, soil type, and grass needs.
Weed and Pest Management
- Regular Inspection: Keep an eye out for new weeds or signs of pest infestation.
- Integrated Pest Management (IPM): Use the least toxic methods first. Encourage beneficial insects, hand-pull weeds, and resort to chemical controls only when necessary and targeted.
Seasonal Lawn Care Checklist
Here’s a general checklist to help with lawn health throughout the year.
| Season | Key Activities |
|---|---|
| Spring | Early Spring: Rake debris, aerate, dethatch if needed, overseed (if not done in fall), apply pre-emergent herbicide for crabgrass. |
| Late Spring: First mowings, fertilize (cool-season grass), spot treat weeds. | |
| Summer | Early Summer: Mow regularly (high setting), water deeply, spot treat weeds, monitor for pests and diseases. |
| Mid/Late Summer: Continue watering, reduce mowing if drought stress occurs, be mindful of disease if humidity is high. | |
| Fall | Early Fall: Aerate, dethatch, overseed (cool-season grass), fertilize (crucial for cool-season grasses), control perennial weeds. |
| Late Fall: Final mowings, remove leaves, consider a winterizer fertilizer for cool-season grasses. | |
| Winter | Minimal Activity: Avoid walking on frozen grass, clear snow to prevent ice damage. |
Step 8: Improving Lawn Appearance with Top Dressing
Top dressing is a technique used to improve the overall quality and appearance of your lawn. It involves applying a thin layer of compost or a soil-compost mix over the turf.
Benefits of Top Dressing:
- Improves Soil Structure: Especially beneficial for sandy or clay soils.
- Enhances Water Retention: Compost helps soil hold moisture.
- Supplies Nutrients: Adds organic matter and slow-release nutrients.
- Smooths Out Uneven Areas: Helps fill in minor depressions.
- Promotes Seed Germination: Creates an ideal environment for overseeding.
How to Top Dress:
- Choose Your Material: High-quality compost, a compost-sand mix, or a specific topdressing blend.
- Apply Thinly: Spread a layer of about ¼ to ½ inch over the lawn.
- Rake It In: Use a stiff broom or rake to work the material into the grass blades and soil surface.
- Water: Water the lawn lightly after top dressing.
Timing: Top dressing can be done in spring or fall, often in conjunction with aeration and overseeding.
Step 9: Patience and Persistence for Lawn Recovery
Lawn recovery is not an overnight process. It requires patience and consistent effort. You might see significant improvement within a few weeks of starting your restoration plan, but achieving a truly lush and healthy lawn can take a full growing season or even longer. Stick with your lawn care regimen, adapt as needed, and celebrate the progress you make.
Frequently Asked Questions About Lawn Revival
Q1: How long does it take to revive a brown lawn?
A1: The time it takes to revive a brown lawn varies depending on the severity of the problem and the methods used. Significant improvements can often be seen within 4-6 weeks, but a full recovery and healthy, green lawn might take a full season or more. Consistent lawn maintenance is key.
Q2: Can I revive a lawn that is completely brown?
A2: Yes, even a completely brown lawn can often be revived if the roots are still alive. You’ll need to address the underlying cause of the browning (e.g., lack of water, disease) and then reseed or use sod to establish new growth.
Q3: What is the best time of year to focus on lawn care for revival?
A3: The best times to focus on lawn care for revival are typically spring and fall, as these seasons offer moderate temperatures and sufficient moisture that are ideal for grass growth and recovery.
Q4: My lawn is very patchy. What’s the best way to fix it?
A4: To fix a patchy lawn, begin with aeration and dethatching to improve soil conditions. Then, overseed the bare and thin areas with a quality grass seed mix appropriate for your climate. Consistent watering and proper mowing will help the new grass establish.
Q5: How often should I water my lawn when trying to revive it?
A5: When reviving a lawn, especially after seeding, water more frequently but lightly to keep the top inch of soil moist. As the grass establishes, transition to deep, infrequent watering (about 1-1.5 inches per week) to encourage strong root development.
Q6: What are common lawn diseases I should look out for?
A6: Common lawn diseases include Brown Patch, Dollar Spot, Red Thread, and Pythium Blight. Identifying the specific disease is important for choosing the correct treatment. Good cultural practices, like proper watering and air circulation, can help prevent many diseases.
Q7: My lawn feels very hard and compacted. What can I do?
A7: If your lawn feels hard and compacted, aeration is your best solution. Core aeration will create holes in the soil, allowing air, water, and nutrients to penetrate and reach the roots. This is a vital step for improving lawn health and promoting recovery.
By following these detailed steps and tips, you can effectively bring your lawn back to life, tackle a patchy lawn, and ensure your yard remains healthy and vibrant. Enjoy your beautiful green lawn!