
Can you level a lawn for a pool yourself? Yes, you can level a lawn for a pool yourself, but it requires careful planning, the right tools, and a good understanding of the process. The complexity can vary significantly depending on whether you’re installing an above-ground pool or preparing the ground for an in-ground pool. This guide will walk you through the essential steps for grading your yard for a pool, ensuring you have preparing ground for in-ground pool success, or a stable site preparation for above-ground pool.
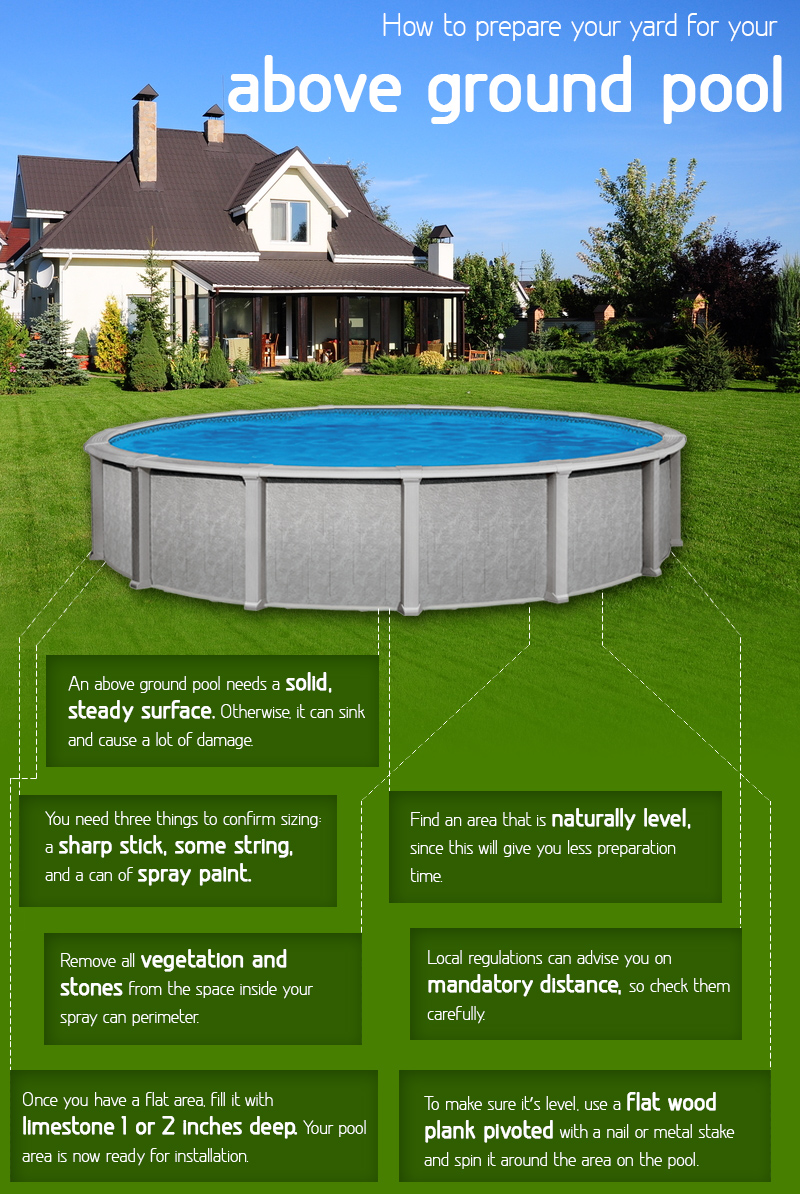
Image Source: affordablepools.com.au
Why A Level Surface is Crucial for Your Pool
Ensuring level ground for pool installation is not just about aesthetics; it’s a fundamental safety and structural necessity. An unlevel surface can lead to uneven water distribution, putting extra stress on the pool walls and foundation. For above-ground pools, this can cause the structure to lean, potentially leading to collapse. For in-ground pools, an unlevel foundation can result in costly structural damage, leaks, and even premature failure of the entire pool system. Proper soil preparation for pool installation is the first step towards a safe, long-lasting, and enjoyable swimming experience. Think of it as the base for your house; if the foundation isn’t right, nothing built on top will be truly stable. This guide will help you achieve that stable base.
Planning Your Pool Leveling Project
Before you pick up a shovel, meticulous planning is paramount. This involves understanding your specific needs, the lay of your land, and the type of pool you’re installing.
Assessing Your Site
Your first step in leveling backyard for swimming pool is a thorough site assessment.
- Survey the area: Look at the general slope of your yard. Are there significant dips or high spots? Where will the pool be situated?
- Identify drainage patterns: Where does rainwater typically flow in your yard? You don’t want your pool area to become a water collection point.
- Check for utilities: Before any digging, contact your local utility companies to mark underground lines (gas, water, electricity, sewer). This is a critical safety step to avoid dangerous accidents.
Choosing the Right Location
The ideal spot for your pool will be:
- The most level area: Minimizing the amount of excavation or fill needed.
- Away from trees: Tree roots can damage pool liners and structures, and falling leaves create a constant cleaning burden.
- Accessible for construction: Allowing easy access for equipment and materials.
- In sunlight: For warmer water temperatures and reduced algae growth.
- Away from septic systems or drain fields.
Determining Pool Type and Leveling Needs
The requirements for digging for pool and excavating for pool differ based on the pool type:
- Above-Ground Pools: These are generally more forgiving of minor imperfections, but a perfectly level base is still essential for structural integrity and safety. You’ll be leveling the ground to place the pool directly on it or on a pad.
- In-Ground Pools: These require a much more precise and extensive leveling process. This involves significant excavation and, often, specialized equipment to ensure the entire pool shell sits on a perfectly flat and stable base. This is where professional pool excavation often becomes a necessity.
Tools and Materials You’ll Need
Gathering the right tools and materials will make the process smoother and more efficient.
Essential Tools for DIY Pool Leveling
- Measuring tape: For precise measurements.
- Stakes and string line: To mark out the pool area and establish level lines.
- Spirit level (various lengths): A long spirit level is especially useful for checking larger areas.
- Shovels and spades: For digging and moving soil.
- Rakes: For spreading and smoothing soil.
- Wheelbarrow: To transport soil and materials.
- Tamper (manual or powered): To compact the soil and create a stable base.
- Garden hose and sprinkler: For wetting the soil to aid compaction.
- Optional but highly recommended:
- Laser level or transit level: For highly accurate elevation measurements, especially for larger or more complex projects.
- Power Auger: Can significantly speed up digging if needed.
- Rototiller: For breaking up compacted soil.
Materials for Base Preparation
- Crushed gravel or paver base: Provides drainage and a stable foundation.
- Sand: A fine layer of sand can help cushion the pool liner.
- Geotextile fabric: Placed under gravel to prevent soil migration and improve drainage.
Step-by-Step Guide to Leveling Your Lawn for a Pool
Let’s break down the process of grading yard for pool into manageable steps.
Step 1: Mark Out the Pool Area
This is where your planning becomes tangible.
- Stake the perimeter: Using your pool’s dimensions, drive stakes into the ground to mark the exact outer edge of your pool area.
- Use string lines: Connect the stakes with string lines. Ensure the strings are taut and at the same height initially. This creates a visual guide for your excavation and leveling. For preparing ground for in-ground pool, this layout is critical for accurate digging.
Step 2: Initial Excavation and Soil Removal
This is the most physically demanding part of the digging for pool.
- Remove sod and topsoil: Carefully remove the grass and top layer of soil within your marked area. You can save the sod for other landscaping projects.
- Dig to approximate depth: Begin excavating the soil to the depth required for your pool. For above-ground pools, this is typically minimal, just enough to create a level base. For in-ground pools, this is the actual excavating for pool phase and requires significant depth.
- Focus on low spots: If your area has a natural slope, you’ll likely be digging down the high sides and possibly adding fill to the low sides. The goal is to create a flat plane.
Step 3: Addressing High and Low Spots
This is the core of leveling backyard for swimming pool.
- Identify the highest point: Locate the highest point of your staked-out area. This point will serve as your reference for the final level.
- Gradually lower high spots: Use shovels and rakes to gradually remove soil from the higher areas, working towards the reference point.
- Fill low spots strategically: If you have significant low spots, you may need to bring in new soil. It’s generally better to remove soil from high areas than to build up low areas with loose soil, as fill can settle over time. If you must add soil, use a good quality topsoil or loam, and compact it thoroughly in layers.
- Use your level frequently: Constantly check your progress with a spirit level or a transit level. Lay the level across the ground in multiple directions to ensure it’s flat.
Step 4: Compacting the Soil Base
Compaction is key to ensuring level ground for pool that won’t shift.
- Lightly moisten the soil: Sprinkle the soil with water. This helps the soil particles bind together when compacted. Don’t make it soggy; just damp.
- Compact in layers: If you’ve added fill or are dealing with a large area, compact the soil in layers of 4-6 inches.
- Use a tamper: Whether manual or powered, tamp the soil thoroughly. Walk over it, use the tamper to press it down. The goal is to eliminate air pockets and create a dense, stable surface. A powered plate compactor is highly efficient for larger areas.
- Re-check for level: After compacting, the ground might settle slightly. Re-check your level and make minor adjustments as needed.
Step 5: Adding a Gravel Base (Recommended for Above-Ground Pools)
A gravel base offers excellent drainage and stability for above-ground pools.
- Spread a layer of crushed gravel: Aim for a layer of 2-4 inches of crushed gravel (like pea gravel or paver base).
- Rake and level: Spread the gravel evenly using a rake. Ensure it’s level across the entire area.
- Compact the gravel: Use your tamper to compact the gravel layer firmly. This creates a very stable and well-draining foundation.
Step 6: Adding a Sand Layer (Optional but Beneficial)
A fine layer of sand can provide a smooth surface and extra cushioning for your pool liner.
- Spread a thin layer of sand: Apply about 1 inch of fine, clean sand over the compacted gravel base.
- Level and smooth: Rake the sand carefully to create a perfectly smooth and even surface.
- Lightly compact the sand: A gentle tamp or even just walking over it can help settle the sand.
Step 7: Final Level Check
Before proceeding with pool installation, perform one last comprehensive check.
- Lay your long spirit level or transit level across the entire surface: Check in all directions (north-south, east-west, and diagonals).
- Address any minor imperfections: If you find very small dips or high spots, you can use a little more sand or carefully scrape away high spots. For significant issues at this stage, you may need to re-evaluate and re-level.
Specific Considerations for In-Ground Pools
Preparing ground for in-ground pool and site preparation for above-ground pool have common principles, but in-ground pools demand a higher degree of precision and often professional intervention.
Excavation Depth and Slope
- Exact dimensions: The excavation for an in-ground pool must be precise, matching the pool’s designed shape and depth. This is where professional excavation services are often contracted.
- Consistent depth: The bottom of the excavated area must be perfectly flat and at the specified depth.
- Proper slope for drainage: While the pool base is level, the surrounding excavated area might need a slight outward slope to direct water away from the pool structure. This is part of proper grading yard for pool that extends beyond the immediate pool footprint.
Soil Stability and Support
- Compaction is critical: The soil at the bottom of the excavation must be compacted to prevent settling.
- Backfilling: Once the pool is installed, the space between the pool wall and the excavated earth needs to be backfilled. This backfill material must be carefully chosen and compacted in layers to avoid creating pressure points against the pool structure. This is a key part of soil preparation for pool installation.
- Geotechnical reports: For complex sites or very large pools, a geotechnical report might be recommended to assess soil stability.
Professional Excavation vs. DIY
When it comes to digging for pool and excavating for pool for in-ground installations, the decision between DIY and professional services is significant.
- DIY: Feasible for smaller, simpler above-ground pools or if you have experience and access to appropriate equipment. It saves money but demands significant time, effort, and knowledge.
- Professional Pool Excavation: Recommended for in-ground pools. Professionals have the heavy machinery (excavators, bobcats), expertise in soil management, and knowledge of local codes and requirements. They can ensure accuracy, efficiency, and safety, which are paramount for the longevity of an in-ground pool. Hiring professional pool excavation is an investment in the pool’s structural integrity.
Maintaining Your Level Pool Area
Once your pool is installed on a level surface, ongoing maintenance is important.
Regular Checks
- Inspect the ground around the pool: Periodically check for any signs of settling or shifting, especially after heavy rains.
- Address drainage issues: Ensure that water is always directed away from the pool.
Seasonal Adjustments
- Winterization: Proper winterization can prevent ground heaving due to frost.
- Spring check-up: Before filling the pool, do a thorough check of the base and surrounding area.
Troubleshooting Common Leveling Issues
Even with careful planning, you might encounter some problems.
Uneven Settling
- Cause: Inadequate compaction, poor quality fill material, or uneven soil composition.
- Solution: For above-ground pools, you may need to partially drain and reposition or level the affected area. For in-ground pools, this can be a serious structural issue requiring professional assessment.
Drainage Problems
- Cause: The surrounding area slopes towards the pool, or the base material isn’t allowing adequate drainage.
- Solution: Improve grading around the pool to direct water away. Ensure gravel bases are clear and functioning.
Dealing with Slopes
- For above-ground pools: The easiest solution is to find the most level spot or excavate into a hillside to create a level platform. Building a deck to create a level surface is also an option.
- For in-ground pools: Significant excavation and grading are required. Sometimes retaining walls are needed to manage excavated earth. This is a strong indicator that professional pool excavation is the best route.
Frequently Asked Questions (FAQ)
Here are some common questions about leveling a lawn for a pool:
Q1: How precise does the leveling need to be for an above-ground pool?
A1: For an above-ground pool, the ground should be as level as possible, with no more than a few inches of difference across the pool’s diameter. Even slight slopes can cause stress on the pool walls.
Q2: Can I just put my above-ground pool on uneven grass?
A2: No, this is highly discouraged. An uneven surface can lead to the pool structure leaning, uneven water pressure, and potential damage to the liner and frame, posing a safety risk.
Q3: What is the best material for the base of an above-ground pool?
A3: A common and effective base includes compacted crushed gravel followed by a layer of fine sand. Some people also use specialized pool pads.
Q4: How deep do I need to dig for an in-ground pool?
A4: The digging depth for an in-ground pool is determined by the pool’s design, including its depth and any steps or features. It’s crucial to adhere strictly to the manufacturer’s or pool builder’s specifications.
Q5: How do I know if I need professional excavation for my pool?
A5: If you are installing an in-ground pool, have significant slopes in your yard, or encounter hard-to-excavate soil (like rock or clay), professional excavation is strongly recommended. They have the equipment and expertise to handle these challenges safely and effectively.
Q6: How long does it take to level a lawn for a pool?
A6: The time can vary greatly. For a small above-ground pool, a DIY leveling project might take a weekend. For an in-ground pool, excavation and grading alone can take several days to weeks, often requiring professional teams.
Q7: What happens if my pool isn’t level?
A7: An unlevel pool can experience uneven water pressure, leading to stress on the walls, potential leaks, premature liner wear, and in severe cases, structural failure. It can also make your pool look unsightly and affect the function of skimmers and returns.
By following these steps and paying close attention to detail, you can successfully prepare your lawn for a pool. Whether you choose a DIY approach for an above-ground pool or opt for professional services for an in-ground installation, a level and stable base is the foundation for years of swimming enjoyment.