
Can you test your lawn mower’s charging system yourself? Yes, you absolutely can! With a few basic tools and a little guidance, you can easily check if your lawn mower’s battery charging system is working correctly. This guide will walk you through the simple steps to test your mower battery and the mower charging circuit.
A mower battery not charging can be a frustrating problem, especially when you need your lawn mower to start. This could be due to a faulty battery, a problem with the mower charging circuit, or issues within the mower electrical system. Fortunately, troubleshooting mower charging issues is often straightforward. We’ll cover how to perform a voltage test, what readings to expect, and what these readings mean for your mower battery and its ability to hold a charge. By following this guide, you can perform a reliable charging system check and get your lawn mower back in action.
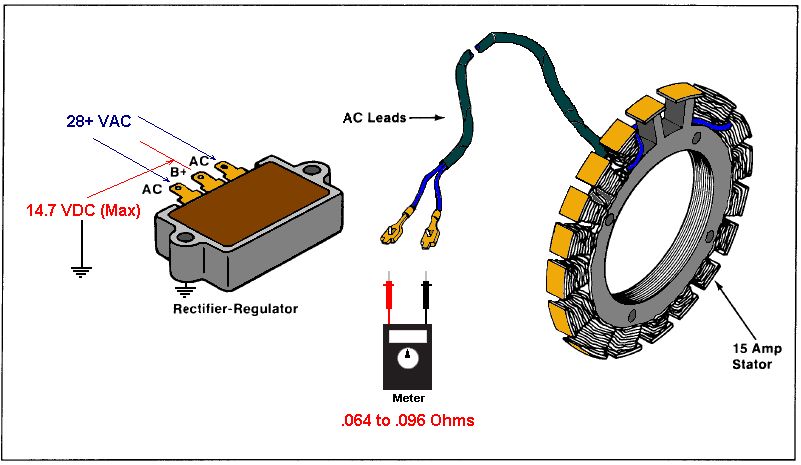
Image Source: cubfaq.com
Why Testing Your Lawn Mower’s Charging System Matters
Your lawn mower’s charging system is vital for keeping its battery healthy and ready to power the engine. This system typically includes an alternator or stator, a voltage regulator, and wiring. When these components work together, they replenish the mower battery’s charge as the engine runs. If any part of this mower electrical system fails, the battery won’t get the power it needs, leading to a battery not charging situation.
A dead battery can leave you stranded. Regular testing of your lawn mower’s battery and its charging system can prevent unexpected breakdowns and save you from costly repairs down the line. It’s a proactive approach to maintaining your equipment. This proactive testing helps ensure consistent performance and longevity for your mower battery.
Signs of a Failing Charging System
Several symptoms can indicate that your lawn mower’s charging system isn’t functioning properly. Recognizing these signs early can help you address the problem before it worsens.
- Slow Engine Crank: If your mower struggles to start, or the engine cranks slower than usual, it might be a sign of a weak battery due to poor charging.
- Lights Dimming or Flickering (if applicable): Some riding mowers have lights. If these seem dim or flicker inconsistently, it points to a voltage issue.
- Battery Not Holding a Charge: The most obvious sign is a battery that quickly goes dead after being charged, or won’t accept a charge at all.
- Overcharging: While less common, an overcharging system can damage the battery, causing it to overheat, swell, or leak acid.
- Mower Dies While Running: If your mower starts but then dies after a short period, especially when the battery should be charging, the charging system is likely failing.
Tools You’ll Need for a Charging System Check
To perform a simple and effective charging system check, you’ll primarily need a multimeter. This electronic tool is essential for measuring voltage, resistance, and current.
The Multimeter: Your Essential Tool
A multimeter is a versatile device that allows you to measure electrical properties. For testing your lawn mower’s charging system, we’ll focus on using it to measure battery voltage.
Types of Multimeters:
- Digital Multimeters (DMMs): These are generally preferred due to their clear numerical displays, making readings easy to interpret. They are accurate and user-friendly.
- Analog Multimeters: These use a needle and dial. While functional, they can be harder to read precisely, especially for beginners.
When selecting a multimeter for your mower battery testing, ensure it has a DC voltage setting (often denoted by a “V” with a solid line above it and a dashed line below it, or “VDC”). Most basic digital multimeters will have this capability.
Other Helpful Tools (Optional but Recommended)
While a multimeter is the core tool, having these can make the process smoother:
- Wire Brush or Battery Terminal Cleaner: To ensure clean and secure connections between the battery terminals and the multimeter probes. Corrosion can give false readings.
- Shop Rags: For cleaning up any grime or battery acid.
- Safety Glasses: Always protect your eyes when working with batteries.
- Gloves: To keep your hands clean and protected.
Performing a Voltage Test on Your Mower Battery
The first step in troubleshooting mower charging is to check the battery voltage when the mower is off. This gives you a baseline reading of the battery’s current state of charge.
Step 1: Prepare the Mower
- Park on a Level Surface: Ensure the lawn mower is parked on a flat, stable area.
- Turn Off the Engine: Make sure the mower engine is completely off.
- Engage the Parking Brake: For riding mowers, set the parking brake.
- Remove the Ignition Key: Take the key out to prevent accidental starting.
Step 2: Access the Battery
The location of the battery varies depending on the type of lawn mower:
- Riding Mowers: Typically located under the seat, in a compartment on the side, or at the front of the mower. Consult your owner’s manual if you’re unsure.
- Push Mowers (Electric Start): Usually found in a small housing near the engine, often accessible by removing a cover plate.
Step 3: Set Up Your Multimeter
- Turn on the Multimeter: Switch the multimeter on.
- Select DC Voltage: Rotate the dial to the DC voltage setting. Choose a range that is slightly higher than the expected battery voltage. Most 12-volt lawn mower batteries will require a setting of 20V DC.
- Connect the Leads (if necessary): Ensure the black probe is plugged into the COM (common) port and the red probe is plugged into the VΩmA (voltage, ohm, milliamp) port.
Step 4: Measure Battery Voltage (Engine Off)
This is a crucial part of the charging system check.
- Identify Battery Terminals: Locate the positive (+) and negative (-) terminals on your mower battery. The positive terminal is usually larger and may have a red cover or marking. The negative terminal is usually smaller and marked with a minus (-) sign.
- Connect the Probes:
- Touch the red multimeter probe to the positive (+) battery terminal.
- Touch the black multimeter probe to the negative (-) battery terminal.
- Ensure good contact: Press the probes firmly against the terminals. If there’s any corrosion, clean it first with a wire brush.
Step 5: Record the Voltage Reading
Note the voltage displayed on your multimeter. Here’s what different readings generally indicate for a 12-volt battery:
| Voltage Reading (Engine Off) | State of Charge (Approximate) | Implication |
|---|---|---|
| 12.6V or higher | 100% (Fully Charged) | Battery is in excellent condition. |
| 12.4V – 12.6V | 75% – 90% | Battery is adequately charged. |
| 12.2V – 12.4V | 50% – 75% | Battery is partially discharged. |
| 12.0V – 12.2V | 25% – 50% | Battery is significantly discharged. |
| 11.8V – 12.0V | 0% – 25% | Battery is deeply discharged. May be damaged. |
| Below 11.8V | Discharged/Damaged | Battery is likely dead or severely damaged. |
Interpreting the Initial Reading:
- If you get a reading below 12.0V, your battery is quite low and may be the reason it’s not starting. You might need to charge the battery before proceeding with further tests.
- If the battery voltage is very low (below 10V) even after attempting to charge, the mower battery itself might be internally damaged and need replacement.
Testing the Charging System While the Engine is Running
Once you have a baseline battery voltage, the next step is to test the mower charging circuit by measuring the voltage while the engine is running. This reveals if the alternator or stator is generating power to recharge the battery. This is a key part of your charging system check.
Step 1: Ensure the Mower is Ready
- Safety First: Make sure the area around the mower is clear.
- Recheck Connections: Ensure the multimeter probes are still securely connected to the battery terminals.
- Multimeter Setting: Keep the multimeter set to the DC voltage setting (e.g., 20V DC).
Step 2: Start the Mower Engine
- Start Safely: Start the lawn mower engine.
- Adjust Probe Placement (if needed): If the battery is difficult to access while the engine is running, you might need to temporarily disconnect the engine from the battery and then reconnect the probes for the test. However, it’s best if you can keep them connected safely.
Step 3: Measure Battery Voltage (Engine Running)
With the engine running, you’re measuring the output of the charging system.
- Observe the Multimeter: While the engine is at a moderate to high RPM (e.g., half to full throttle), observe the voltage reading on the multimeter.
Step 4: Analyze the Running Voltage Reading
This is the critical part of diagnosing a battery not charging issue.
| Voltage Reading (Engine Running) | Implication |
|---|---|
| 13.5V – 14.5V | Normal: The charging system is working correctly. It’s providing enough voltage to recharge the mower battery. |
| 13.0V – 13.5V | Low Output: The charging system may be weak. It’s charging, but not optimally. Investigate further. |
| Below 13.0V | Faulty Charging System: The alternator/stator or voltage regulator is likely not working. |
| Above 14.5V | Overcharging: The voltage regulator may be faulty, potentially damaging the battery. |
What to do based on the readings:
- If voltage is between 13.5V and 14.5V: Congratulations! Your mower charging circuit is likely functioning well. If you were experiencing issues, they might have been related to a temporarily drained battery or a loose connection that you’ve since rectified.
- If voltage is below 13.0V: This strongly suggests a problem with the mower charging circuit. The alternator or stator might be faulty, or the voltage regulator could be malfunctioning. This is a common cause for a battery not charging.
- If voltage is above 14.5V: This indicates overcharging, which is also a problem. The voltage regulator’s job is to keep the charging voltage within a safe range. If it’s allowing too much voltage, it can damage your mower battery and other electrical components.
Further Troubleshooting for a Failing Charging System
If your voltage test indicated a problem with the mower charging circuit, you’ll need to dig a bit deeper. This often involves testing individual components of the charging system.
Testing the Alternator/Stator Output
The alternator (on some riding mowers) or stator (on most push mower engines) is responsible for generating the electricity. A common failure point is a broken wire or a failed winding.
What you’ll need:
- Your multimeter (set to AC voltage if testing the stator output directly, or DC voltage for the regulator output).
- Your mower’s service manual.
General Steps (may vary by mower model):
- Locate the Alternator/Stator: This is usually a component mounted near the flywheel on gasoline engines. It’s a set of coils.
- Disconnect the Alternator/Stator Wires: Carefully disconnect the wires leading from the alternator/stator to the voltage regulator.
- Set Multimeter to AC Voltage (for Stator): If your manual specifies testing AC voltage output from the stator, set your multimeter to the appropriate AC voltage range.
- Measure Stator Output: Connect the multimeter probes to the stator output wires. Crank the engine briefly. You should see a voltage reading. The exact voltage will vary greatly by mower model and RPM, so consult your manual for expected values. If you get a very low or no reading, the stator may be faulty.
- Alternatively, Test for Continuity/Resistance: Many service manuals will provide resistance values for stator windings. You can test for continuity or measure resistance between the stator leads and between the leads and the engine block (ground) using your multimeter’s resistance setting. Infinite resistance or a complete lack of continuity usually means the stator is bad.
Testing the Voltage Regulator
The voltage regulator controls the charging voltage to prevent overcharging and ensure optimal charging.
What you’ll need:
- Your multimeter.
- Your mower’s service manual.
General Steps (may vary by mower model):
- Locate the Voltage Regulator: This is typically a small electronic module connected to the alternator/stator and the battery wiring harness.
- Test Regulator Output: With the engine running and the multimeter connected to the battery terminals (as you did in the previous section), observe the voltage. If the voltage is correct (13.5-14.5V), the regulator is likely working. If the voltage is too high (overcharging) or too low (undercharging, and the stator output is good), the regulator is often the culprit.
- Check Regulator Connections: Ensure the regulator is securely connected and its wires are not damaged.
- Consult Service Manual for Specific Tests: Many regulators can be tested more directly by checking voltage inputs and outputs at specific terminals with the engine running, but this requires referring to your mower’s specific service manual.
Checking Wiring and Connections
A simple loose or corroded wire can cause a battery not charging issue. This is part of the mower electrical system that is often overlooked.
- Inspect Battery Terminals: Ensure they are clean and tight.
- Check Wires to Regulator: Follow the wires from the battery to the voltage regulator and from the stator/alternator to the regulator. Look for any signs of fraying, corrosion, or loose connections.
- Inspect Ground Connections: Ensure all ground wires are clean and securely fastened to the mower frame. A poor ground can disrupt the entire electrical system.
- Check Fuses (if applicable): Some mowers have fuses in the charging circuit. Check your owner’s manual to locate them and test for continuity.
Common Lawn Mower Charging System Problems and Solutions
Let’s summarize the common issues you might encounter during your charging system check.
Problem: Battery Voltage is Low (Engine Off)
- Possible Causes: Battery is old, battery is deeply discharged, battery has internal damage, or the charging system has not been working.
- Solution:
- Try charging the mower battery with an external charger. If it won’t accept a charge or dies quickly, replace the battery.
- If it charges and holds voltage, then investigate the charging system as outlined above to see why it wasn’t being charged.
Problem: Battery Voltage is Low (Engine Running)
- Possible Causes: Faulty stator/alternator, faulty voltage regulator, loose or corroded wiring.
- Solution:
- Test the stator/alternator output. Replace if faulty.
- Test the voltage regulator. Replace if faulty.
- Clean and tighten all wiring connections and grounds.
Problem: Battery Voltage is Too High (Engine Running)
- Possible Causes: Faulty voltage regulator.
- Solution:
- Replace the voltage regulator.
Problem: Mower Cranks Slowly or Not at All
- Possible Causes: Discharged mower battery, corroded battery terminals, faulty starter solenoid, or a bad connection in the starting circuit.
- Solution:
- Perform a voltage test on the battery.
- Clean battery terminals.
- Test starter solenoid and connections.
Problem: Mower Dies While Running
- Possible Causes: The charging system has failed, and the battery is providing all the power. Once the battery is depleted, the engine dies.
- Solution:
- Immediately perform a charging system check as described above. The problem is almost certainly the charging system.
What is a Lawn Mower Charging System?
A lawn mower charging system is an electrical circuit designed to keep the mower battery charged while the engine is running. It typically consists of:
- Stator or Alternator: This is a component with coils of wire that generates AC electricity when the engine’s flywheel (which often has magnets) rotates past it.
- Rectifier/Regulator (often combined): This component takes the AC power from the stator and converts it into DC power. The regulator part then controls this DC voltage to prevent overcharging the battery.
- Battery: Stores the electrical energy.
- Wiring Harness: Connects all these components together.
Can I Charge My Lawn Mower Battery Without a Working Charging System?
Yes, you can charge your lawn mower battery using an external battery charger designed for 12-volt batteries. This is a common way to maintain the battery if your mower’s internal charging system is not functioning, allowing you to use the mower until the charging system can be repaired.
FAQs About Lawn Mower Charging Systems
Q1: How long should I charge my lawn mower battery?
A: The charging time depends on the charger’s amperage and how discharged the battery is. A trickle charger (1-2 amps) might take 24 hours or more. A faster charger might do it in a few hours. Always follow the charger’s instructions and the battery manufacturer’s recommendations. It’s best to check the battery voltage periodically to avoid overcharging.
Q2: My battery is new, but it’s not charging. What could be wrong?
A: If your mower battery is new, the problem is very likely with the mower charging circuit. This means the stator/alternator or the voltage regulator is probably not working, or there’s a wiring issue preventing power from reaching the battery. Perform the voltage test while the engine is running to confirm this.
Q3: Can a bad battery damage the charging system?
A: Yes, a severely damaged or shorted-out battery can sometimes overload and damage the voltage regulator or stator. Conversely, a faulty charging system (especially one that overcharges) can quickly damage a good battery.
Q4: My riding mower has a light that’s dim. Does this mean the charging system is bad?
A: A dim light can be an indicator of a weak charging system, but it’s not definitive. It could also be a loose connection to the light itself, a failing bulb, or a very low battery charge. Always perform a voltage test on the battery first to get a clearer picture.
Q5: How do I know if my mower battery is bad?
A: A mower battery is likely bad if:
* It won’t hold a charge after being properly charged.
* The voltage test shows significantly less than 12.0V even after charging.
* The battery case is swollen, cracked, or leaking.
* The battery is old (most lawn mower batteries last 3-5 years).
By following these steps, you can effectively perform a charging system check on your lawn mower and ensure your mower battery is receiving the power it needs to keep your equipment running smoothly. This simple voltage test is a fundamental part of troubleshooting mower charging and maintaining your mower’s mower electrical system.